
What is Innoslate?
Innoslate supports the full lifecycle of systems, from requirements definition and management to operations and support.
Innoslate uses the Lifecycle Modeling Language (LML) and Systems Modeling Language (SysML) to describe its concepts and diagrams. LML was developed to simplify the elements, relationships, attributes, and diagrams used in systems engineering and project management. SysML is an extension of a subset of the Unified Modeling Language (UML) that describes the standard way to visualize the diagrams.
Innoslate is available as a Software as a Service (SaaS) or a self-hosted web application known as Innoslate Enterprise.
Organizations
An Innoslate organization is a collection of projects, teams, and user roles. An organization typically represents a company, business unit, or team.
Every organization has a unique name, a description, its own URL and its own separate database that is physically stored apart from other organizations.
Within an organization, users can be Members, Reviewers or Admins. Super Admins and Administrators configure users, define teams, modify or add custom roles, and assign user licenses. Members of an organization can create and view projects shared with them. Reviewers of an organization cannot create projects but can view and comment on shared ones.
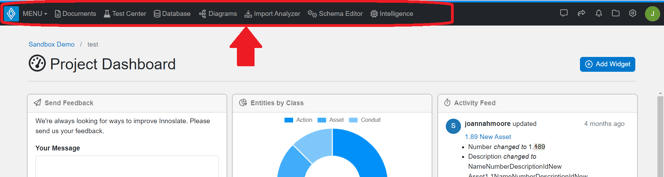
The first landing spot for users when they sign up to Innoslate Cloud is the Organization Dashboard, as depicted below.

All Innoslate Cloud users will be placed in the 'Sandbox Demo' Organization. where they can trial projects with up to 500 entities. We highly recommend using the Guided Tour with the 'Start Guided Tour' button to help guide users with their desired views in Innoslate.
For more information on the Organization Dashboard, please see this site.
Projects
An Innoslate project is a collection of entities and a means of organizing the project's data. A project can contain any number of requirements documents, system models, simulation results, reports, test results, project management tasks and more.
Each project has a name, a description, its own database, and a list of users who have permissions to access it.
Innoslate users have the ability to create any number of new projects, edit the name and description of existing projects, and delete and share their existing projects with any other Innoslate user within their Innoslate organization. Users will usually access their projects on their respective organizational dashboard under the My Projects Table.

Entities
An entity is something that can exist by itself and is uniquely identifiable. We apply the LML definition of an entity to the database objects that store information and files in an Innoslate project. Each entity in Innoslate includes a name, number, description, and possible additional attributes and relationships with other entities. By default, Innoslate‘s database schema specifies 27 unique types of entities called classes and child classes. Each class defines what information (which attributes and relationships) can be stored within that type of entity. Child classes inherit their parent class's attributes and relationships. These classes mirror the LML Specification 1.4 and make Innoslate LML-compliant.
Innoslate‘s database schema includes 14 parent classes:
Action, Artifact, Asset, Characteristic, Connection, Cost, Decision, Equation, Input/Output, Issue, Location, Risk, Statement, and Time.
Innoslate‘s database schema also includes 13 child classes:
Conduit (child of Connection), Dependency (child of Connection) Logical (child of Connection), Measure (child of Characteristic), Orbital (child of Location), Physical (child of Location), Port (child of Asset), Requirement (child of Statement), Resource (child of Asset), Task (child of Action), Test Case (child of Action), Transition (child of Action) and Virtual (child of Location).
Attributes
An attribute is an inherent characteristic or quality of an entity. It further describes an entity and enhances its uniqueness. Every attribute has a name and a specified data type. We applied the LML definition of an attribute to the individual pieces of information which can be stored within an entity.
Innoslate‘s default database schema includes the eight mandatory LML attribute data types (Text, Number, Boolean, Percent, DateTime, URI, Enumeration, and GeoPoint) and 12 additional attribute data types (Big Text, Equation, File, Duration, Quality, Multiplicity, Computable, Equation, Html, Multiselect, User Team).
Relationships
A relationship connects entities to each other and provides traceability back and forth between the entities. We applied the LML definition of a relationship to be bi-directional connections which can be made between two entities in Innoslate.
Attributes on Relationships
An Attribute on a Relationship further enhances a relationship between two entities with an attribute. Innoslate adopts the LML definition of Attributes on Relationships and includes a unique name that can be used in other relationships to enhance communcation.
Labels
A label is an identifying short word or phrase used to classify similar entities in the same class into categories, much like a folder system is used to group together similar projects. Differing from folders however, more than one label can be applied to each entity, allowing the user to categorize, and subsequently filter, similar entities as they see fit.
Label options vary, depending on the class of the entity selected.
For more details on the entire Innoslate Schema, please see this page.
How does Innoslate work?
As you create and edit diagrams, documents, and more within the tool, Innoslate seamlessly works in the background to automatically generate and update each diagram and document view in your project's database. This eliminates the need for manual updates and ensures that your project remains up-to-date. Each view is equipped with database access and the ability to interpret the model, enabling it to display the information in various formats. For example, if you use ‘Requirements View’ to develop a requirements document, then several other products can be automatically generated in Innoslate from the same model including a ‘Hierarchy Chart,’ ‘Document Tree Diagram,’ 'Spider Diagram' and the ‘Traceability Matrix.’.
The underlying LML model being created is primarily composed of seven classes of entities that form the basis of any system design: Requirement (child of Statement), Artifact, Action, Asset, Input/Output, Conduit (child of Connection), and Characteristic entities. Gaining a thorough understanding of these entities and their relationships is essential for comprehending Innoslate and the broader field of system architecture. Let's take a moment to delve into these seven primary elements of our Innoslate design.
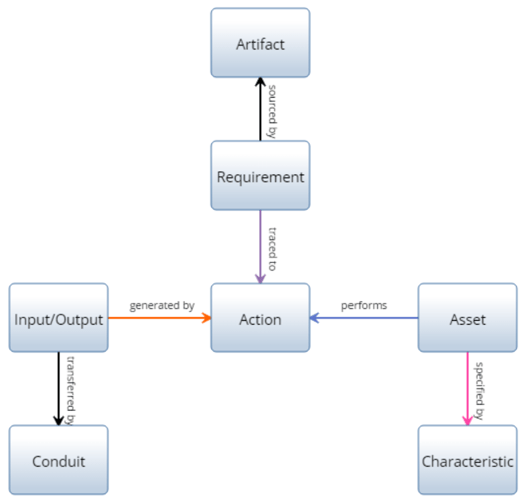
The Requirement class in Innoslate, when populated, contains requirement elements that constitute the actual system requirements. Examples of requirements are: ‘The Autonomous Vehicle shall accept Destination Location from the User’ – an input requirement; and ‘The Sensors shall provide Camera Data to the Control System’ – an output requirement.
The input and output requirements are grouped into an Artifact entity, such as a document.
Next, we have to get some sense of what our system is going to do. To model the capability of our system, we use Action entities to define a functional architecture. For instance, we might want to design a system to perform the action ‘Drive Vehicle.’ However, once we decide what our system will do, we need to implement that capability.
The physical implementation of our architecture consists of tangible elements – which can include hardware, software, or even human components. In Innoslate, we call these Asset entities. For example, an ‘Autonomous Vehicle’ asset might be used to perform the action ‘Drive Vehicle.’
In Innoslate, Input/Output entities are the primary form of communication between actions. In order for items to flow among the elements in our system, the components will need to communicate with each other through some type of connections. Innoslate defines Conduit entities that facilitate the transfer of inputs/outputs. Additionally, Innoslate incorporates Characteristic entities to define and measure key system metrics.
The element definitions from the Lifecycle Modeling Language specification are as follows:
A Requirement entity identifies a capability, characteristic, or quality factor of a system that must exist for the system to have value and utility to the user.
An Artifact entity specifies a document or other source of information that is referenced by or generated in the knowledge base.
An Action entity generates effects and may have pre-conditions before it can be executed. This Action can include transforming inputs into outputs, the process by which inputs are transformed into outputs.
An Asset entity specifies an object, person, or organization that performs an action, such as a system, subsystem, component, or element.
An Input/Output entity specifies the matter, energy, and/or information input to, triggers (controls), or output from an Action.
A Conduit entity specifies the means for physically transporting Input/Output entities between Asset entities. It has limitations (attributes) of capability and latency.
A Characteristic entity specifies properties of an entity.
For more details on the entity classes, their attributes, relationships, and attributes on relationships, click here.
Signing Up and Signing In
Now that you have a firm grasp on the concepts and how Innoslate works, let’s get started by signing up for the cloud-based version of Innoslate!
- On any device, using a modern browser (e.g. Google Chrome, Mozilla Firefox, Microsoft Edge, Apple Safari, etc.) navigate to cloud.innoslate.com/signup.
- Enter your email address and click on the ‘Sign Up’ button.
- After receiving the activation email from Innoslate, click the link in the email to activate your account.
- Enter your information in the ‘Activate Your Account’ screen and click the ‘Activate Account’ button.
- After activating your account, you will be able to sign into Innoslate Cloud.
For more detailed instructions, see our Signing Up and Signing In documentation.
Navigating Innoslate
The top navigation bar is a constant fixture throughout the application. No matter where you navigate within Innoslate, this navigation bar will remain fixed at the top of your browser window. This bar is your primary means of navigating around Innoslate. Try opening the drop-downs and navigating around the various views and tools in Innoslate, while reading through the below list of features, to learn your way around. Read more on this here.
MENU Drop-down
The ‘MENU’ drop-down is the leftmost feature of the top navigation bar as shown below:
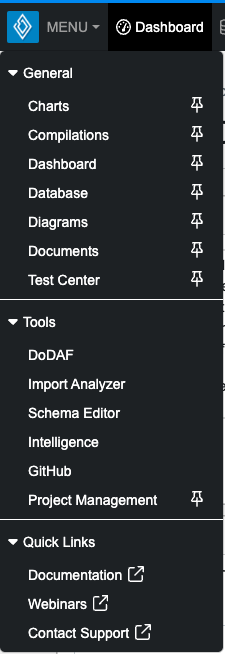
This drop-down contains menu items with the links necessary to successfully navigate around the various views in Innoslate. The links under the drop-down are arranged into three sections: General, Tools, and Quick Links.
Under the “General” section are navigational links to Charts Dashboard, your Project Dashboard, Database View, Diagrams Dashboard, Documents Dashboard, and Test Center Dashboard.
Under the “Tools” section are navigational links to tools within Innoslate: DoDAF Dashboard, Import Analyzer, Schema Editor, Intelligence Dashboard, GitHub Dashboard, and Project Management Dashboard.
Under the “Quick Links” section, are helpful links to get you started using Innoslate including technical documentation, webinars, and other resources.
Pinned Links
The  button to the immediate right of the items in the ‘MENU’ drop-down indicate those that have been “pinned” to the top navigation bar. By default, four items are pinned to the bar: Dashboard, Database, Diagrams, and Documents. You have the option to pin any view/tool to the navigation bar by clicking on this pin icon. Alternatively, you can navigate to the desired destination by simply clicking on the button of the view/tool name in the MENU dropdown. The top navigation bar can also be re-arranged by clicking and dragging the view/tool to the desired order on the header. We highly recommend pinning the features of Innoslate you use most often for easy one-click access.
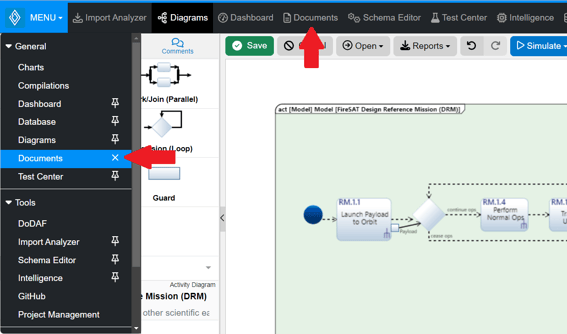
![]()
To the right of the pinnable views, users have access to the features discussed below.
Chat Sidebar Icon
Clicking the ‘Chat Sidebar’ button toggles the collaboration sidebar open and closed. You will find the collaboration sidebar fixed to the right of your browser window when it is open. The sidebar allows you to see which users are currently online collaborating on the same project and gives you access to chat with those users in a group or one on one.

Share Icon
Clicking the ‘Share’ button opens the ‘Share Project’ dialog. By utilizing the share functionality, users have the ability to easily manage project members, including adding or removing them, and assigning specific roles. This promotes a smooth collaboration experience throughout the entire project. To learn more about sharing projects and roles you can access that at Shared Access Management.

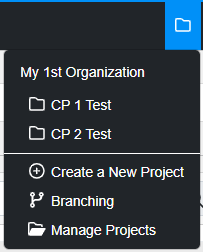
Switch Project Drop-down
The ‘Switch Project’ drop-down contains links to switch to any of your existing projects, as well as 'Create a New Project' link, which opens the ‘Create a New Project’ dialog box and a 'Manage Projects' link that directs you to the Manage Projects View.
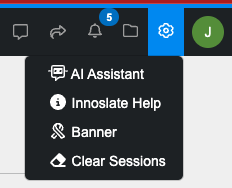
Project Preferences
The ‘Project Preferences’ drop-down is displayed as a gear circle that will display the following features available: 'AI Assistant', 'Innoslate Help', 'Banner', and 'Clear Sessions'.
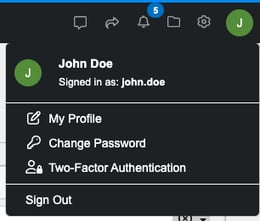
Name Icon
The ‘Name’ icon is a drop-down menu to the far most right of the top navigation bar. This icon is displayed as a green circle with your first initial. Clicking this icon allows you to access/update your Innoslate user profile, change your password, activate two-factor authentication or sign out of Innoslate.
Further Reading
Now that you’ve been properly introduced to Innoslate, we encourage you to further your knowledge by reading our next guide: Requirements Management and Analysis.