
Welcome to the Requirements Management and Analysis guide!
This guide is meant to demonstrate how to use Innoslate for requirements management and analysis. If you haven’t already, we recommend reading our Innoslate 101 guide before proceeding.
As you know, system requirements are the backbone of systems engineering and are essential in every organization. Your goal is to improve and maintain quality, mitigate risks, lower cost, and reduce time to market, all while keeping aligned with your customer's requirements. As products and systems become more complex, your goals become more challenging. Innoslate makes it simpler than ever before to have full lifecycle traceability for your requirements. Capture, analyze, and manage all of your requirements all in one place. Innoslate’s web browser user interface makes it easy for your team to collaborate in real time, tracking all of the requirements throughout the product/system lifecycle.
.png?width=670&name=google-car%20(1).png) Photo: Google
Photo: Google
To show you how to use Innoslate with a realistic example, we will use an “Autonomous Vehicle” sample problem. SAE International defines six levels of driving automation, which span from no automation (Level 0) to full automation (Level 5). Level 5 automation is a complex and current problem faced by the entire automotive industry. For our originating requirements, we will utilize artifacts derived from the SAE International Level 5 standards.
Capture Standards
The first step is to capture your requirements in Innoslate. You might derive your requirements from any of the following: customer needs statement, lessons learned, policies and procedures, laws, standards, etc. To see this in action, let’s start with importing a requirements document to derive new requirements.
- Create a new Innoslate project with the name “Lesson – Autonomous Vehicle.” For detailed instructions on creating a project, see our Creating Projects documentation.
- Download our example “SAE Automation Sample Requirements” spreadsheet by clicking here.
- Open the ‘MENU’ drop-down located on the top navigation bar and click the ‘Import Analyzer’ menu item in the “Tools” section.
- Follow our Importing Microsoft Excel (csv) Files documentation to import our example “SAE Automation Sample Requirements” spreadsheet into Innoslate.
The ‘Import Analyzer’ analyzes the document’s overall structure and will import all of the statements and requirements right into your project. A Statement entity specifies text while a Requirement entity identifies what a system must do to have value and utility to the end user.
Be sure to select Statement for the default class AND check the box to "Set entity to specific class when description contains a certain word or phrase." Select the specific class to Requirement and for this exercise, leave the 'Certain words or phrases' field as is. This ensures the Import Analyzer will differentiate between Statements and Requirements entities.

You’ve now successfully imported a requirements document.
Baseline Requirements
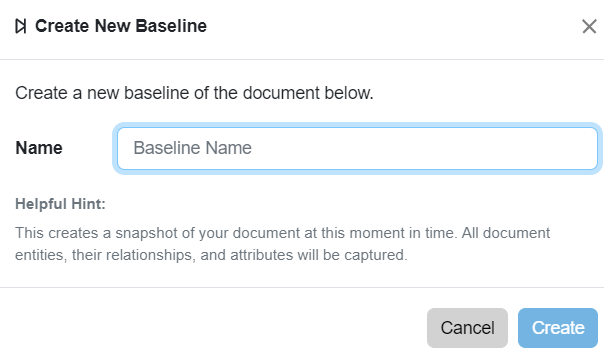
Now that your originating requirements are imported, you can preserve the original document through baselining. A baseline is a read-only snapshot of the document that is preserved until the document is deleted. To do this:
- Within your Requirements Document in ‘Documents View,’ click the ‘Baseline’ button located under the ‘More’ drop-down on the toolbar.
- Provide a name for the baseline, ex. “Original Document.”
- Click the ‘Create’ button.
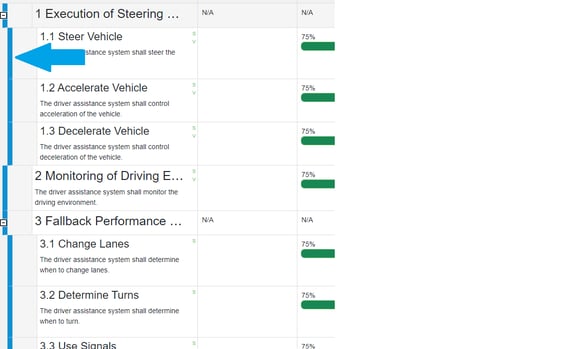
Once the new baseline has been created, the only visual cue that indicates this happened will be a color change from yellow to the blue of the baseline indicator (the left-most block of color on every row in ‘Requirements View’). While the baseline indicator remains blue it indicates the statement or requirement has not changed since the last baseline. If the baseline indicator is yellow it means the statement or requirement has been changed since the last baseline or has never been baselined.
It’s good practice to create baselines every once in a while, to help track the changes your team has made throughout the project. To go back and review an existing document baseline, follow the steps outlined in our Baseline documentation.
Analyze Requirements
We have successfully imported our originating requirements, but how do we know their quality? Unique to Innoslate, the 'Quality Check' feature of ‘Documents View’ uses natural language processing to parse requirements and analyze the text to understand the grammar and structure.
Innoslate provides the following quality indicator attributes built into the default schema of the Requirement class:
| Innoslate Quality Check Attributes (v4.10) | |
| Necessary | Feasible |
| Appropriate | Verifiable |
| Unambiguous | Correct |
| Complete | Conforming |
| Singular | |
Innoslate's Quality Check Attributes have been meticulously aligned with specific INCOSE Rules, enabling users to aim for a maximum score of 78% with the possibility to get a 100% after Human Verification.
To run a Quality Check against all the Requirement entities in your document, click the ‘Quality Check’ button located under the ‘More’ drop-down on the toolbar.

It will take a few seconds to run. When it’s done, you will see your score in the 'Quality Score' column. Remember, only six of the eight attributes can be checked automatically, for a maximum automatic score of 78 percent. The results of the analysis appear below.
After the “Quality Check” has been completed, you need to verify the results and address any issues. Click on any Requirement (not a Statement) entity. Next, choose the tab labeled ‘Attributes’ on the left sidebar. This tab shows additional attributes not already shown in a column in ‘Documents View,’ including the quality indicator attributes and the issues identified by the “Quality Check.”
Continue to click through all the requirements and you will find that the following issues have been identified:
- Ambiguous Words: Ambiguous words were identified in requirements 4.2 and 4.3. You can find this suggestion under the Verifiable attribute in the left sidebar. You will want to replace “high speed” (> 55 mph) and “low speed” (< 40 mph) with absolute values.
- Listed Terms: Requirement 3 contains multiple requirements. These requirements should be split into three children requirements. To do this:
- Select requirement number “3. Fallback Performance of Dynamic Driving Task.”
- Click on the ‘Add Child’ button located on the toolbar.
- Name the child requirement “Change Lanes” and type in “The driver assistance system shall determine when to change lanes.” as the description.
- Repeat the previous steps to add two more child requirements: “Determine Turns” (description: “The driver assistance system shall determine when to turn.”) and use “Use Signals” (description: “The driver assistance system shall determine when to use signals.”).
- Remove the text from the description in “3. Fallback Performance of Dynamic Driving Task.”
- Since “3. Fallback Performance of Dynamic Driving Task” is no longer a requirement, transform the Requirement to a Statement.
- Select “3. Fallback Performance.”
- Click on the ‘More’ drop-down on the toolbar.
- Under the ‘Transform to’ section, select the ‘Statement’ menu item.
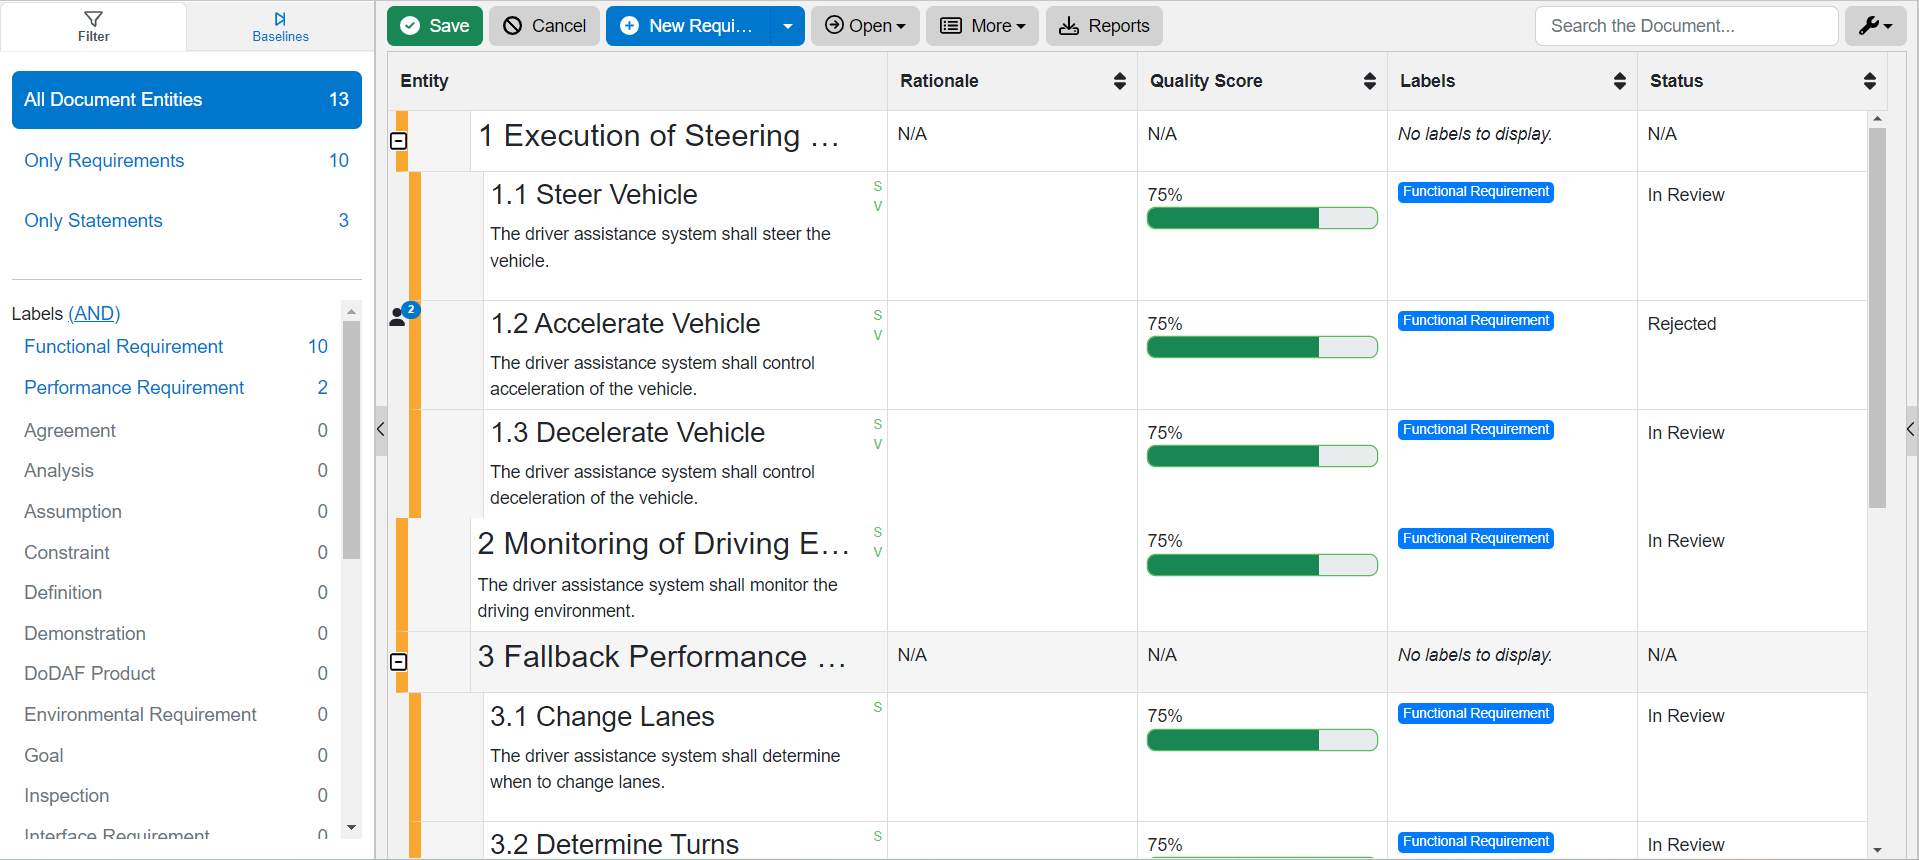
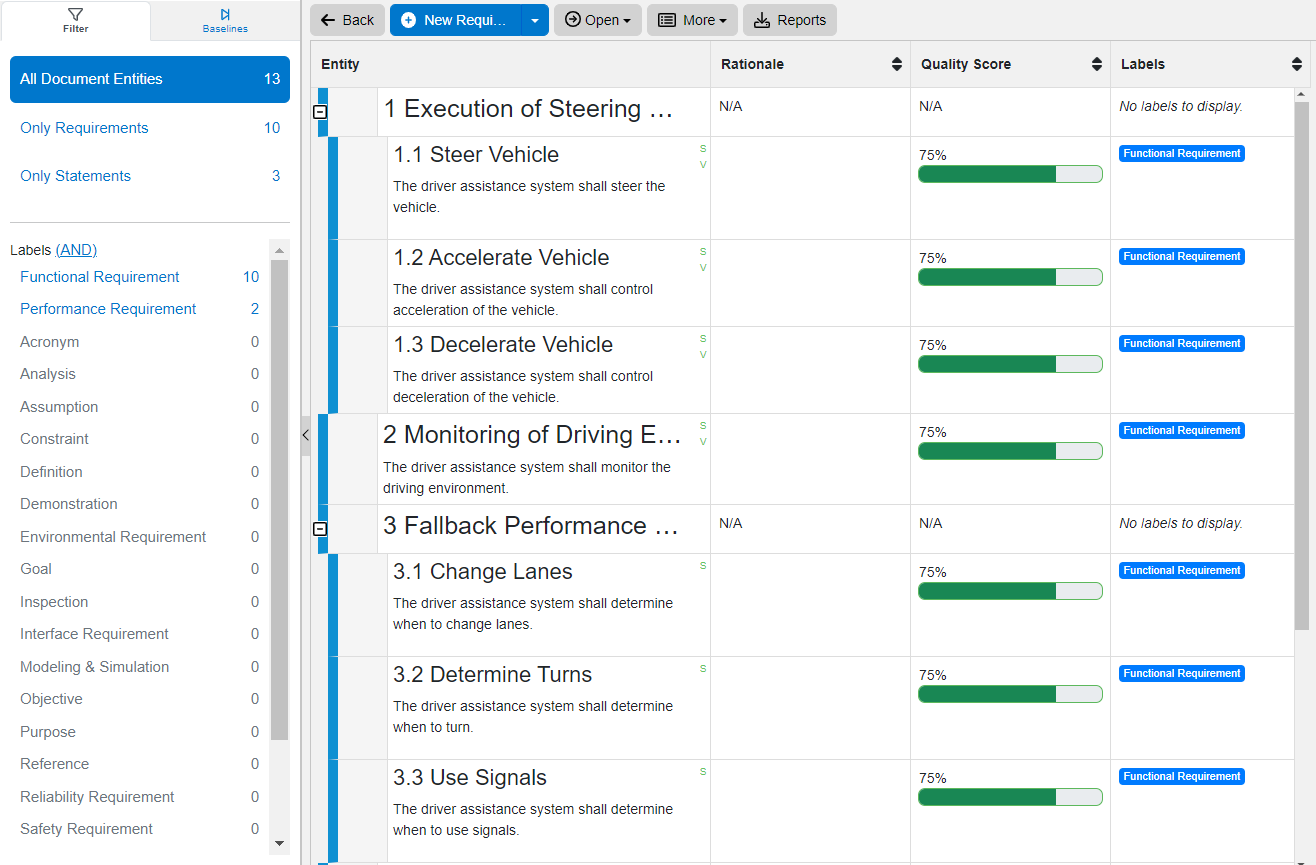
After you have cleaned up your document, re-run the “Quality Check.” Since your requirements have been re-analyzed, you should baseline your document again. The document should appear similar to the picture below:
Please note: If you manually set any of the quality indicator attributes to "Yes," re-running the Import Analyzer will overwrite your changes.
Now that you have a well-written requirements document, let’s continue to the next section.
Managing Requirements
The “SAE Level 5 Automation Requirements” sample document currently contains only ten requirements; however, over time, this project may contain hundreds or thousands of requirements. Organizing your requirements is essential to developing models at scale.
Often requirements documents will contain a combination of different types of requirements (ex. Functional Requirements, Performance Requirements). Innoslate uses labels to aid in the organizational structure of models. Unlike a folder system, a single model element can have multiple labels (whereas a single model element cannot be in multiple folders).
-
Add labels in bulk via ‘Database View’
- Click on the ‘Database’ button on the top navigation bar.

- In ‘Database View,’ filter the view to only display Requirement entities by clicking ‘Requirement’ in the “Classes” section of the left sidebar.

- Click the, ‘Select All,' checkbox in the table header to select all of the ‘Requirement’ entities.

- Click the ‘Bulk Label’ drop-down.

- Select the ‘Functional Requirement’ label.

- You will now see that all of your selected ‘Requirement’ entities have acquired the label of ‘Functional Requirement.’

- Click on the ‘Database’ button on the top navigation bar.
-
Add labels via ‘Documents View’
- Click the ‘Documents’ button on the top navigation bar to return to ‘Documents View.’

- Select the “SAE Level 5 Automation Requirements” sample document.

- Select requirement number 4.2 named “High-Speed Cruising.”

- From the left sidebar under Metadata, in the Labels section, click ‘Performance Requirement.’

- Click the Deselect button on the top toolbar to save the requirement.

- Repeat these steps for “4.3 Low Speed Traffic Jams.”
You will now see that these ‘Requirement’ entities have acquired the Label of ‘Performance Requirement.’

- Click the ‘Documents’ button on the top navigation bar to return to ‘Documents View.’
-
Filter your requirements
In ‘Documents View,’ under the ‘Filter’ tab of the left sidebar, click ‘Performance Requirement’ under 'Labels.' This will filter our document to display only Requirement entities with the Performance Requirement label.

Click ‘Clear Label Filter’ to clear the label filter and return to your normal view.
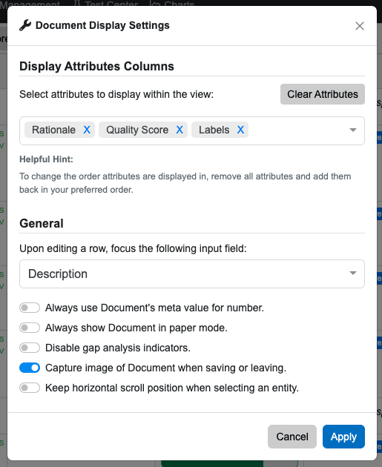
Customize your Attributes
-
Innoslate allows you to customize the attributes that you want to see in the columns in ‘Documents View.’ By default, the following three columns will be shown: “Rationale,” “Quality Score,” and “Labels.” Click to open the ‘Wrench’ drop-down located on the toolbar icon and select the ‘Settings’ menu item.

Here you can change which columns are displayed.
Formatting Requirements
Click on any requirement or statement. This will open it up and make the text editable. You can add, delete, cut, copy, and paste the text. On the text editor’s toolbar, the third feature from the left is the ‘Insert’ drop-down. Click to open the ‘Insert’ drop-down and you will see the options to insert links, images, diagrams, charts, entity notations, entity table notations, and horizontal rules. Innoslate allows you to insert diagrams straight into a document. As you make changes to the diagram in Innoslate, those changes will be reflected in the document as well.
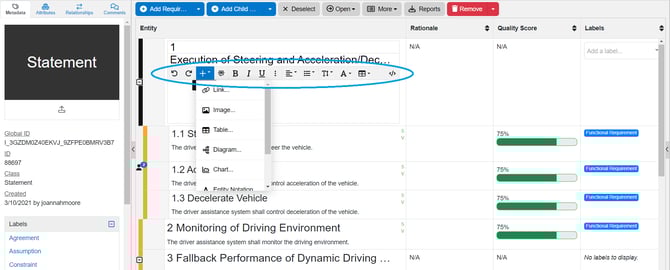
Additional formatting options include: undo, redo, bold, italic, underline, strikethrough, superscript, subscript, align, bulleted list, numbered list, list indentions, text size, text color, highlight color and a table editor.
Click on the deselect on the top tool bar to save changes when you are finished formatting.
Tip: Want to change the prefix or fix document numbers? For detailed instructions, see our Automatically Numbering All Document Entities in the Documents Dashboard Features documentation.
Visualizing Requirements
As you may recall from Innoslate 101, a relational model is underlying Innoslate, which allows for the auto-generation of diagrams. To try this out, use the ‘Tree Diagram‘ button to review the structure of our requirements document. Follow these instructions to navigate to the ‘Tree Diagram:’
- Within ‘Documents View,’ click on the ‘Open’ drop-down located on the toolbar and
select the ‘Tree Diagram.’
The ‘Tree Diagram’ displays the entire document hierarchy to show traceability within the document. By default, the first three levels of decomposition are displayed. On documents with more than three levels of decomposition, the third level of tree nodes will be shaded, indicating they can be clicked to expand subsequent levels.

On the left sidebar, you will find three tabs: 'New,' 'Existing,' and 'Comment.' In the 'New' tab, simply drag the circle node from the left sidebar and drop it into the diagram canvas to effortlessly create new statements and requirements. Rest assured, any changes made in the Tree Diagram will automatically update in the document. The ‘Existing’ tab allows you to add existing statements and requirements. Once you've selected the existing entities, the existing requirements can be dragged and dropped into the hierarchy. The 'Comment' Tab allows you to leave a comment for your team to see.
To easily visualize traceability, we recommend using the ‘Spider Diagram.’ Follow these steps to navigate to the ‘Spider Diagram:’
-
- Within the ‘Tree Diagram,’ click on the ‘Open’ drop-down located on the toolbar and select the ‘Spider Diagram’ menu item.

- Within the ‘Tree Diagram,’ click on the ‘Open’ drop-down located on the toolbar and select the ‘Spider Diagram’ menu item.
The ‘Spider Diagram’ is a type of hierarchical organizational chart used in Innoslate as a means of visualizing traceability. This diagram is capable of displaying up to ten levels of decomposition of entities arranged in concentric circles radiating outwards from the center.

Further Reading
Now that you’ve been properly introduced to Requirements Management and Analysis, we encourage you to further your knowledge by reading our next guide: Model-Based Systems Engineering