
Sections Available in this Section
| Feature | Description |
|---|---|
| Creating a Project | Creating a project in Innoslate sets the foundation for your work, allowing you to start organizing your ideas, tasks, and collaborations on the Platform. |
| Copying a Project | Duplicating a project in Innoslate allows you to create an exact copy of an existing project. |
| Editing Project Settings | Editing a project in Innoslate provides the flexibility to modify project settings and details. |
| Deleting a Project | Deleting a project in Innoslate permanently removes the selected project and all its associated data. |
Creating a Project
There are multiple ways to create a new project in Innoslate.
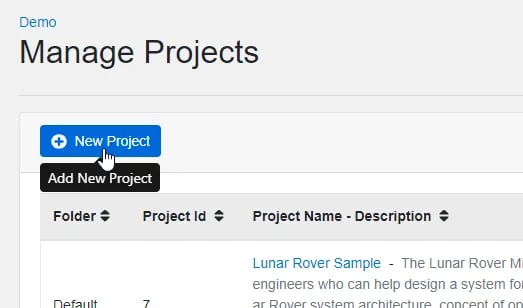
From the ‘Manage Projects' page, you can click the ‘+ New Project’ button, located in the ‘Manage Projects’ heading.
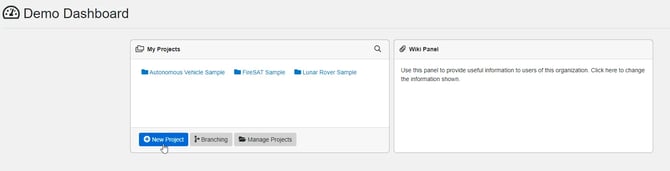
You can also find the ‘+ New Project’ button on your ‘Organization Dashboard,’ in the footer of the ‘My Projects’ widget.
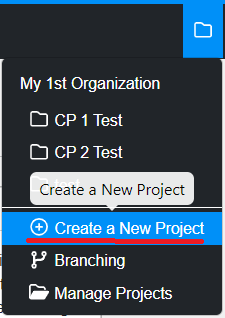
Finally, you can also create a new project from anywhere in Innoslate by clicking the ‘Switch Projects’ button in the top right of your navigation bar, and selecting ‘Create a New Project.’
Creating a New Project
Once you have clicked to add a new project, the ‘Create a New Project’ dialog will appear to guide you through creating your project.
1. First, you will enter your project Name and optional Description.

2. You will have the option to place your new project in an existing or new folder, by clicking the ‘Folder’ drop-down and selecting a folder name or typing in a new name. If nothing is selected, your new project will go into the ‘Default’ folder.

3. Finally, click the ‘Create & Go’ button to create your new project and be directed to your ‘Project Dashboard.’

Copying a Project
1. On the ‘Manage Projects‘ page, click the ![]() icon to copy the project.
icon to copy the project.

2. You can customize which parts of the project you want to copy (i.e. Schema Only, Include/Exclude Comments, etc.) and choose the name of the newly copied project. Once your settings are ready, click the ‘Copy’ button. This will duplicate your selected project with the chosen settings, and automatically open the new copied project’s ‘Project Dashboard.’

3. The next time you view your ‘Manage Projects’ page, you will notice that your project copy has been added to your project list as “Copy of…”

Editing Project Settings
1. On the ‘Manage Projects‘ page, click the ‘Edit this project’s preferences’ button next to the project you wish to edit.

2. This will open up the ‘Edit existing project settings’ dialog box, complete with a form you can use to edit your project. Enter a new name, description, or folder selection.

3. Click ‘Save’ to save any changes you made to your project.
Deleting a Project
1. From your ‘Manage Projects' page, click on the ‘X’ icon (‘Delete this project’) next to the project you wish to delete.

2. This will open up a red dialog box for you to confirm you are sure you wish to permanently delete this project and all of its associated data. If you are sure, click ‘Confirm Delete’ to complete the process and return to your ‘Manage Projects’ page.
