Documents View Features

Leverage the capabilities of Innoslate's Documents View features to enhance requirements management and analysis.

Auto Number a Document How to Auto Number a document.
Baseline a Document Baseline a document to establish a reference point.
Save a Document Template Save your document's template to reference in a new document.
Acronym Extraction for Reference Extract Acronyms in a document for team reference.
Find & Replace Find and Replace text for easy editing.


documents view features menuBelow we will explore the various features available under the 'More' option in Documents View.

Auto Number

Auto Number Docs View

Auto numbering in Innoslate allows for the application of sequential numbers to entities within a Document, based on their hierarchical structure. This feature can be accessed by clicking on the 'More' dropdown in Documents View. Once selected, a pop-up window will appear, allowing users to specify the starting number (defaults to 1 if left blank) and add a prefix, or choose to only add a prefix to the existing numbering scheme of the document.

Auto Number Pop Up Docs View

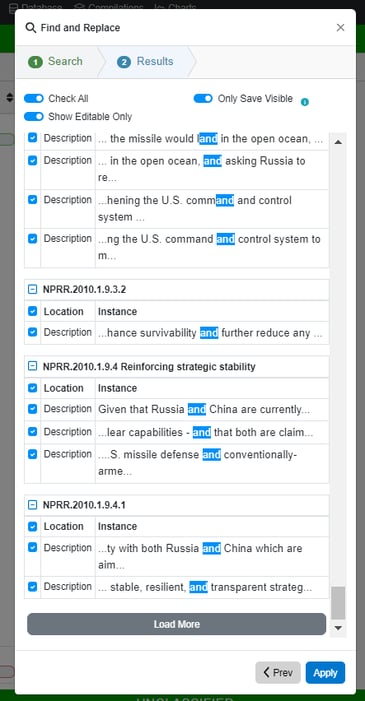
Note this will only add to the number field of an entity. To find and replace within the number field, use the Find and Replace feature.

Users may also use the Auto Number feature for just a certain section of the document by clicking on a parent entity within the document and clicking on 'More' then 'Auto Number.' Doing so will bring up the following window so users may selecto to re-number and/or add a prefix for that particular section of the document:

auto number window documents view

Users may also use the filter on the left sidebar to auto number those shown entities.

Baseline a Document

Creating a baseline for a document captures a snapshot of the document's entities, relationships, and attributes. To create a baseline, select the 'Baseline' option under the 'More' button on the top toolbar. Please note, only users who have the role of 'Owner' in the project are able to create a baseline for a document.

Baseline Docs View

A pop up will appear to name the baseline.


Baseline window docs view

The entities in the document will be marked with blue baseline indicators to indicate that the document has been baselined.

Baseline Indicator-1

Review an Existing Document Baseline

To review an existing document baseline, refer to the Baselines Tab on the left sidebar as circled in the image below.

Baseline tab Docs View

In the Baselines section, users will find a list of their baselines along with their creation date and time, as indicated by the red arrow. By clicking on a baseline, users will be able to view all statement and requirement entities, including their relationships and attributes, for that version of the document. It's important to note that all baselines are displayed as read-only and cannot be edited. To resume editing a document, simply switch back to the current version by clicking on the top document link under Main Document, indicated by the red square in the image.

Document Template

Innoslate's 'Template' feature allows users to save a document format for easy recall when creating new documents. This functionality empowers users to uphold uniformity across various documents, eliminating the need to recreate redundant information.

To get started, select 'Template' in the 'More' dropdown of Documents View.

Template feature Docs View

The Template pop up will appear to name the template and include any images or files that were included in the corresponding template.
Template pop up docs viewA confirmation will pop up to advise the template has been saved. Innoslate users will then be given the option to go to the Documents Dashboard to create a new document or can close out the pop up to continue working in the current document.
Template confirmation docs view
The new template will be available for that document type upon creating a new document under the 'Custom Template' option.
custom template option docs dash

Delete a Custom Template

When you create a template, there is an Artifact entity created with the template name, like shown below.

how to remove custom template

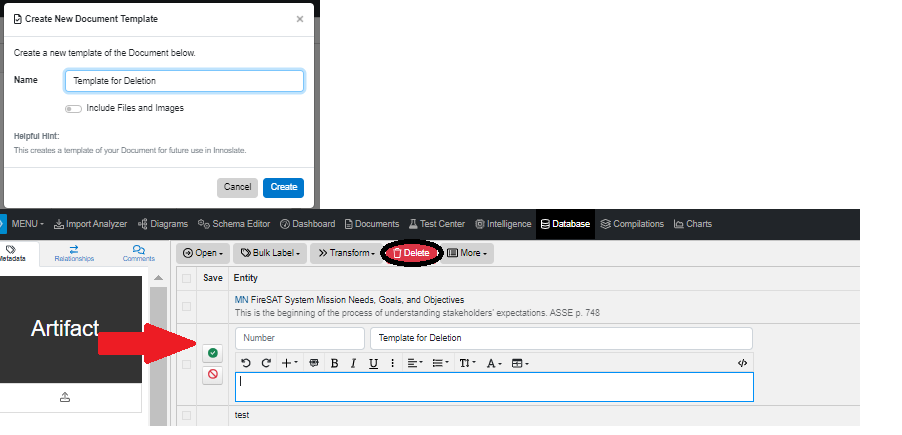
Delete that artifact entity and it will remove the custom template from the dropdown during document creation.

Acronym Extractor

The Acronym Extractor feature in Innoslate enables users to extract all acronyms from a current document and compile them into a separate document, along with their corresponding full names.

Select the ‘Acronym Extractor’ button located in the menu of the document.
Acronym Extractor Docs View

When users select the 'Acronym Extractor' option, a popup will appear, allowing users to choose the 'Extraction Options' and the 'Confidence Level' under the 'Setup'  tab. The 'Extraction Options' determine which fields the extractor will use to extract acronyms from the document's entities. While the extractor will display all acronyms for the corresponding confidence level, the 'Confidence Level' selected in this step will be the one initially displayed in step 3.
Step1 options Acronym Extractor Pop Up
  • A 95% Confidence level means that the acronym is found multiple times in the document with a possible detected definition.
  • A 65% Confidence level means that an acronym is found once with a possible detected definition.
  • A 40% Confidence level means that an acronym was found but there was not a definition detected with it.
After selecting ‘Next,’ the ‘Acronym Extractor’ will  move on to the 'Extract' tab and show the number of acronyms discovered.
Step2 Acronym Extractor Pop Up
The extracted results can be found under the 'Validate' tab, as shown in the image below. Users have the option to expand or collapse the confidence levels and review the entity from which the acronym originated within the document (indicated by the red squares in the image) . This includes the entity's id, attribute field, and location.
The name field, indicated by the red arrow, will display the detected name. Users have the ability to edit this field. After validating the results and making any necessary modifications, select the acronyms desired to include in the acronyms document, as indicated by the red circle, and click 'Next' to proceed with the final steps.

Step3 Acronym Extractor Pop Up

In the ‘Generate’ tab there are to apply to the selected acronyms, such as where they will be stored, the traceability of the acronyms, and hyperlink the chosen acronyms to the acronym document.
  • Under ‘Acronym Document’ users can select which document to add the acronyms to. Those options include adding acronyms to that specific document’s acronym document or to an overall project’s acronym document.
  • Under ‘Traceability’ users can select to create traceability from the acronyms to the current document to the acronym document.
  • Under ‘Hyperlinks Creation’ users can select to create hyperlinks to those acronyms in the document.

Step4 Acronym Extractor Pop Up

Upon selecting the 'Create' button, Innoslate users will be redirected to the Acronyms Document, where they will find all of the acronyms they have selected.

Acronyms Document Docs View

Find and Replace 

The 'Find and Replace' feature allows Innoslate users to find and replace certain words or phrases within the document.

Find and Replace Docs View

After selecting 'Find and Replace' under the 'More' button, a pop-up window will appear, allowing users to choose which entity attributes to use for finding the words or phrases. This dropdown will allow users to select any combination of the 'Name.' 'Number' or 'Description' fields. Provide the text to search for using the 'Find' field, then provide the new text with the 'Replace' field. Make the search case-sensitive by turning the 'Match Case' toggle on. Click 'Next' for the results.
 

inputted find and replace step 1 docs view

In the 'Results' tab, a list of entities with instances of the word searched for will be displayed.
Find and replace results docs view
From here, select which entities should be replaced. Use 'Check All' to select or unselect all the instances. Or users may select individual entities to update with the blue check marks to the left of the found entity.
Note, the initial 50 results will be automatically shown. If there are more than 50 results, simply click on the 'Load More' button (located at the bottom, in dark gray) to view additional entities.
Find and Replace visibility docs view
 
To replace only the entities that have been loaded in the pop-up, choose the 'Only Save Visible' toggle. If this option is disabled, it will replace all entities, regardless of whether they are in the popup or not.
If there are entities in the document that cannot be edited, select the 'Show Editable Only' toggle so that only entities that can accept the replace will display.

Click 'Apply' once complete and the replacement will execute.


To continue learning about Documents View, Click Here.

(Next Article: Documents View Settings & Search)