
Innoslate Admins have the capability to efficiently oversee user management within their organization, ensuring that users receive dedicated access to their Innoslate organization sandbox.

Managing Users
The Users Table displays the authorized users for the Organization, showcasing columns of users by Name, Username, Created Date and Role.

From this table, users may:
- Add/Remove a User
- Search for a User
- Assign their Organization Role
- Sort the columns by Name, Username, Created Date and Role (Organizational)
- Navigate to the User Activty Dashboard
It is important to note that functionality from this table is ideal for smaller user management tasks. If onboarding multiple users and managing multiple license types in one session, then we suggest the License Dashboard.
Add/Remove a User
Add a User

1. Hover your cursor over the top right header of the User Table and select the 'Add User' icon![]() . The 'Add a User(s)' window will appear.
. The 'Add a User(s)' window will appear.

2. In the first field 'Users', enter desired user(s) by their username or email address. Note, after entering the username/email, hit enter. This will allow it to be captured by the form. Then continue typing to enter another user, if desired.
3. Select the 'License Type'.
4. Select their Organizational Role.
5. Select “Add”, so the user(s) will be added to the User table on the Admin Dashboard.
Organization Roles
Organization roles determine a user's highest level of access and privileges throughout the entire organization. Only users assigned the Admin Member role have access to the Admin Dashboard, which enables them to manage:
-
Users
-
Teams
-
Roles
-
Organization Schema configurations
-
License Type
The type of license associated with your organization determines which organization roles can be assigned to users.
| Organization Role | Access Admin Dashboard? | Create Projects? | Typical Use Case | License Requirement |
| Admin Member | Yes | Yes | Organization administrators: manage users, teams, roles, schema, licenses, etc. |
Named or Floating User License |
| Member | No | Yes | Internal team members who collaborate in projects (can be assigned high project roles like Owner or Collaborator) | Named or Floating User License |
| Collaborator | No | No | External or limited contributors with write access in specific projects | Floating or Named Collaborator License |
| Reviewer | No | No | Users who need read + review/comment |
Floating or Named Reviewer License |
| Viewer | No | No | Read-only stakeholders | Floating or Named Viewer License |
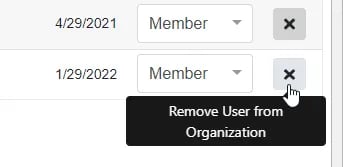
Remove a User
1. Select the 'Remove User' icon in the desired User's row.
Search for a User
Organizational Admins can search for specific users within a Team on the Teams Dashboard.
1) Click on the Search icon on the Users table(![]() ), a search field will appear.
), a search field will appear.
2) Enter the username or email of the user to search for.
3a) To clear the search field and search for another user, simply click on the "X" next to the Search Field.
3b) Select "Close Search" to fully close the Search Field.
Watch the demonstration in the video provided below to see these steps in action.
Users Report
In version 4.13, the Download Users Report feature delivers a comprehensive CSV export containing details on all users within the organization. This includes the total user count along with individual records for each user, covering key information such as usernames, profile names, creation dates, assigned organization roles, and any teams they belong to—providing administrators with a clear, exportable overview for management, auditing, or reporting purposes.
To download this report, hover your mouse over the heading of this panel and select the download button to select this report.
Users Activity Dashboard

The User Activity Dashboard provides administrators with a comprehensive overview of platform activity for a specific user. To navigate to it, simply click on the User from the Users Table of the Admin Dashboard.
The dashboard is divided into several key widgets that deliver real-time insights into project management, user behavior, and system usage.
On the left, the Project Creation list displays recently created projects with their names and creation dates, helping admins track new initiatives. The central Project Tracker features an interactive calendar that highlights event density per day (e.g., number of events or projects accessed), allowing quick visual scanning of activity levels. Below it, the User Activity radar chart visualizes usage patterns across different project types and actions, such as making it easy to identify the most active projects for that user in the platform. Additionally, the User Activity radar offers flexible configuration options, including legend position (left, right, top, bottom, or none), and allows users to export the chart as a transparent or opaque PNG image for presentations or documentation.
On the right, the User Activity Feed serves as a chronological log of the user's actions (e.g., updates to metadata, diagram changes, label additions, or relationship modifications). This feed can be filtered by CRUD criterion (Create, Read, Update, Delete) and a custom date range, giving admins precise control over what activity to display. The feed also supports exporting the filtered data as a CSV file for further analysis or reporting.
Overall, this dashboard is a powerful administrative tool for monitoring platform health, user engagement, and project lifecycle events in the Innoslate ELP Center.
To continue learning about Licenses and Users, Click Here.
(Next Article: Manage Project Roles)