
This guide demonstrates how to use Requirements AI together with an AI File Package to generate a full set of requirements from an existing model file without needing to import that model into your project first. If you haven't already, we recommend reading our Innoslate 101, AI File Packages, and Requirements AI articles before proceeding.
Sometimes you already have a model file, an Action Diagram export, a specification, or similar, and you want the AI to reference it directly to draft requirements, rather than importing every entity into your project first. AI File Packages let you upload that file, and Requirements AI can reference it via Retrieval-Augmented Generation (RAG) to ground the requirements it drafts.
This is a great example of the start of our Middle-Out approach: we begin with a procedural model (in this case, an Action Diagram describing the AI tokenization process) and derive functional requirements directly from it.
To show you how this works with a realistic example, we will use a sample "AI Token Transmission Process" file, an Action Diagram export that describes how a system takes a piece of natural language input, tokenizes it, transmits it to an AI model for processing, and returns a result.
About the Sample Model
.webp?width=670&height=144&name=ai_token_transmission_process_action_diagram%20(1).webp)
Our sample model walks through the full lifecycle of a prompt — from raw text input to generated response — using the example input "I love AI":
-
Inputs "I love AI": the raw text input.
-
Tokenization splits the text into tokens (e.g., "I," "love," "AI").
-
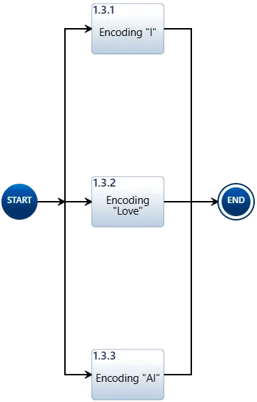
Token Encoding converts each token into a numerical ID simultaneously, "I" → 43, "love" → 872, "AI" → 1956, via three parallel sub-steps (Encoding "I," Encoding "Love," Encoding "AI").
-
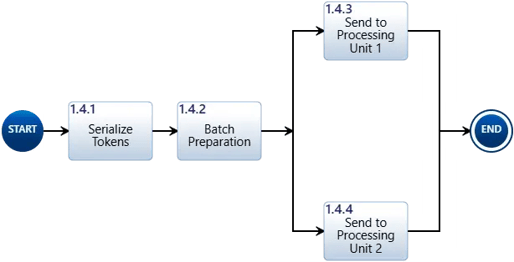
Transmission to Model sends the encoded tokens to the neural network in three sub-steps:
-
Serialize Tokens arranges them into a sequence (e.g., [43, 872, 1956]);
-
Batch Preparation adds padding or metadata as needed; and
-
Send to Processing Unit 1/2 transmits the batch to the model's processing unit (e.g., GPU/TPU), with parallel distribution across cores.
-
-
A Token Limit Check decision determines whether the token count exceeds a set limit (e.g., 4,096), routing to an Error path if it does.
-
Computation processes the tokens in parallel across the model's layers (via Processing Input Token 1/2), predicting response tokens (e.g., [298, 99]).
-
Token Decoding converts those numerical tokens back into text (e.g., "Cool!"), and Output Delivery returns the response to the User.
The model also includes two assets referenced throughout: the User (who submits the input) and the AI System (which performs the computation).
To download this sample model file, click here.
Before continuing you must be doing this walkthrough in an Innoslate environment integrated with an AI Model, such as Innoslate Cloud in the 'Demo Organization'.
Step 1: Create a Blank Project and Blank Document
- From the Project Dashboard, create a new project (e.g., "Lesson – AI Tokenization Requirements").
- Navigate to the Documents Dashboard, Create a new Document with a Blank Template where the generated requirements will be created.
Step 2: Upload the Model to an AI File Package
- Click the "?" help icon to open the File Packages modal, and toggle "Use File Packages" on.
- Upload the sample model file, provided in JSON format, using the "Upload File For File Packages" box.
- In the File Packages field, click Create File Package and name your package (e.g., "AI Token Transmission Process").
- Click Save.
For more detail on this modal, see our AI File Packages article.
When uploading an Innoslate model export as a file package, JSON is the preferred format over XML — Requirements AI parses it more reliably and produces noticeably better results.
Step 3: Accessing the Generator
-
Open your new Document and select "Generate Requirements" from the "More" dropdown menu.
Step 4: Providing Context
-
In the Requirement Generator Modal, turn Target Entity Off so you can enter an open-ended prompt instead of targeting a model entity directly.
- Reference your file package by name, for example:
-
"Reference the 'AI Token Transmission Process' file package and generate requirements describing the tokenization, encoding, transmission, computation, and output delivery process, including the token limit error path."
-
Confirm the yellow file-package icon is showing on the modal before generating, to verify the file package is active for this session.

-
Step 5: Configuring Parent and Child Requirements
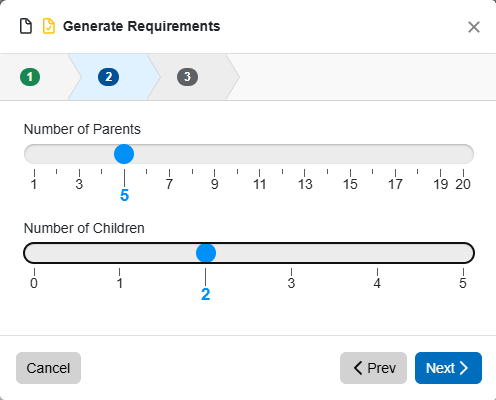
- In the Configure phase, use the sliders to set how many parent and child requirements you'd like generated.
- For a model of this size, a small set (e.g., 3–5 parent requirements, each with 1–2 children) is a reasonable starting point; you can always run the generator again to expand coverage later.
- For a model of this size, a small set (e.g., 3–5 parent requirements, each with 1–2 children) is a reasonable starting point; you can always run the generator again to expand coverage later.
Step 6: Verifying Generated Requirements
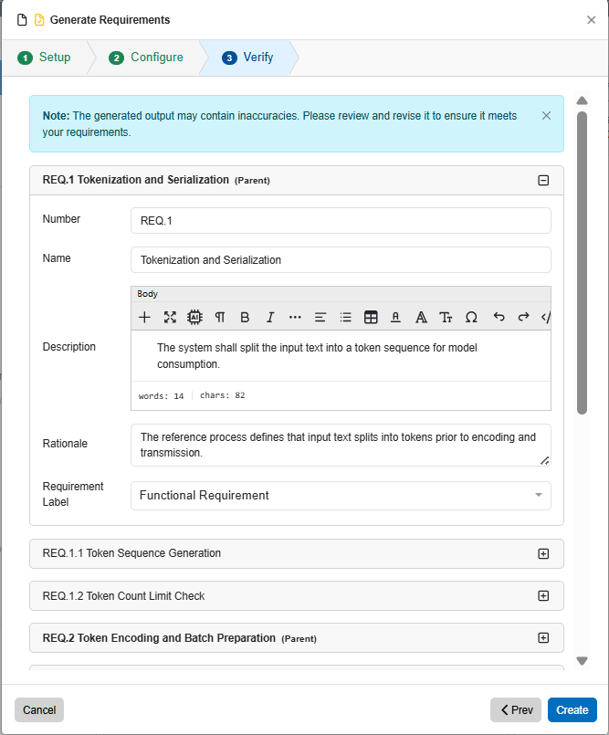
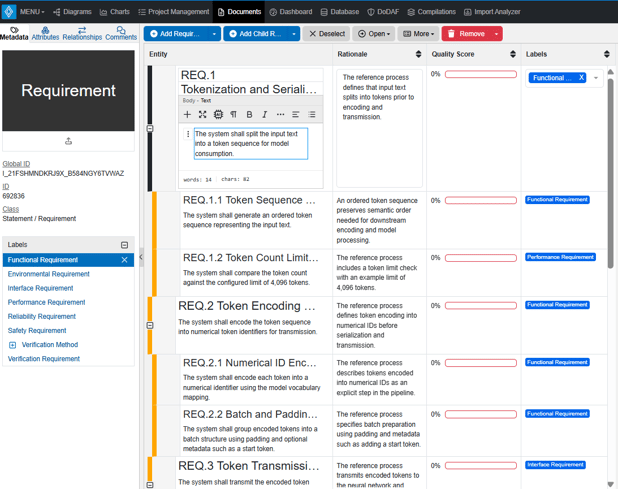
- In the Verify phase, review the proposed requirement set. You should expect to see requirements addressing behaviors like:
- Tokenization and Serialization
- Token Sequence Generation
- Token Count Limit Check
- Token Encoding and Batch Preparation
- Numerical ID Encoding
- Batch and Padding Preparation
- Token Transmission and Computation
- Transmission to Neural Network
- Model Inference Computation
- Token Limit Error Path
- Error Trigger Condition
- No Transmission on Error
- Token Decoding and Output Delivery
- Numerical Token Decoding
- Output Delivery Verification
- Tokenization and Serialization
- Expand each entry to review its full Requirement Statement, Rationale, and Label (e.g., Functional, Performance, Safety Requirement).
- Since the model includes a decision point (Token Limit Check) and an error path, confirm the generated set includes at least one requirement addressing the error/exception behavior, a good check that the AI referenced the full file package content, not just a partial summary.
- Since the model includes a decision point (Token Limit Check) and an error path, confirm the generated set includes at least one requirement addressing the error/exception behavior, a good check that the AI referenced the full file package content, not just a partial summary.
Step 7: Finalizing Requirements
-
Once you've reviewed and are satisfied with the proposed set, click "Create." The new requirements are embedded directly into your active document and ready to be managed like any other requirement; quality-checked, labeled, baselined, and decomposed further.
Next Steps
Now that you have a generated requirement set based on your file package, we recommend:
-
Running a Quality Check on the new requirements, as covered in our Requirements Management and Analysis Guide.
-
Using the Requirements Expander to add sibling or child requirements as your model evolves; see the Requirements AI article for details.
-
Continuing to Test Case AI to generate test cases that verify these new requirements.
- Want the Action Diagram itself in your project too? Run the same JSON file through Import Analyzer to bring in the diagram natively, then relate its entities to your generated requirements for full traceability between model and requirements.
Conclusion
In this walkthrough, you saw how Requirements AI and AI File Packages work together to turn an existing model file into a grounded, traceable set of requirements — without ever having to import the model as native entities first. Starting from a blank project, you uploaded the "AI Token Transmission Process" model, prompted Requirements AI to reference it directly, and reviewed and created requirements covering the model's full behavior, including its error path. From here, those requirements are ready to be quality-checked, expanded, and carried forward into test case generation — or, if you'd like the diagram itself in your project, imported and linked back for complete traceability.