

Creating a Calendar Chart
Step 1: Navigate to ‘Charts Dashboard’ then click on ‘Create Chart’.
 Step 2: Choose ‘Calendar’.

Step 3: Give the root entity a name or number, then click ‘Next’.

Step 4: Select 'Finish'.
You will then be navigated to your new Calendar.

Calendar View

- Left Sidebar
- Toolbar
- Calendar
Let's take a closer look at the features in these sections individually.
Left Sidebar

Before selecting anything in Calendar View, the left side bar will have 2 tabs, 'Root' and 'Comments'.
Root Tab
The Root Tab on the Left Sidebar allows users to edit the Root Entity by clicking on the name of the Root Entity. Simply click on the name (above 'Change calendaer query:') to display the Root Entity's Name, Number and Description fields for editing.


Users may also update the calendar with the 'Change Calendar Query' so users may filter for certain tasks. Users may type their query in the field or use the Advanced Search Editor to create the query. Select 'Generate' to update the Calendar with the query. A confirmation will prompt to confirm these changes.

To update the calendar to bring back all tasks, clear the query field and regenerate the calendar.
Comments Tab
These comments are a part of the Root Entity of the Calendar. For more information on the functionality of the Comments, please refer to this article.Toolbar

The top toolbar is above the Calendar and under the NAvigation bar. This bar features the following features:
'Back' Takes users back to your previous view.
'+New Event' Allows users to add to their Calendar and Create a New Event
'Open'- This allows users to see the Calendar in another view.
'Reports' See Calendar Reports
'Search' Open the 'Search' window to locate and navigate to a specific event within the Calendar by clicking on the event's checkbox and selecting 'Confirm'.

⚠️Only events that are a) associated with the current Calendar chart query and b) events that are not hidden by one of the Filter Groups will show up in the search results.
⚠️To navigate back to the current month, click the ‘Today’ button in the toolbar:

Settings
To edit and configure your Calendar settings, click on the wrench button at the top right, then select ‘Edit Settings’.

From here, you can create Filter Groups which take a unique name and the choice of either 1 or more Generic Labels, or a Class and some combination of 1 of its DateTime attributes and 1 or more labels (both are optional if a class is selected). Once you have the group options set, click ‘Add’ to add them to the settings group list.

Once the Filter Group has been added, you have the option of showing/hiding all events that match the criteria you specified. By default, Holidays are also shown so that you can choose to show/hide all Holidays.
In the General section, you may also toggle Holidays on or off.

You may also change the background and text colors for each Filter Group by clicking one of the pencil buttons for that group. To go back to the default colors, select the eraser button next to the pencil.

As the colors change, the name of the group in the middle will change to show a preview of what your background/text color combination will look like. Hovering over the name displays the Class/Label/Attribute combination that makes up that Filter Group.

To remove a Filter Group, click the red ‘X’ button next to that group row in the Colors section of the settings.

Calendar View

Users may select tasks, holidays and days with tasks or holidays in Calendar View. Below we'll cover what options are available when they are selected.
Select Calendar Event

Entities can be edited by clicking on the event in the Calendar. This will change the left sidebar and display the ‘Metadata’, ‘Attributes’, ‘Relationships’ and ‘Day’ tabs.
The ‘Remove’ button in the toolbar is also displayed. Removing the event from the chart will delete that entity’s DateTime attribute associated with the particular selected event.

Note: The ‘Remove’ button also includes a dropdown menu where you can select ‘Delete from Database’ or the default option of ‘Remove from Chart’.
Clicking the ‘Day’ tab shows all of the events on the selected day, including each entity’s name/number, class name, DateTime attribute associated with that particular event, and the attribute’s time. The border color corresponds to the group that entity type is assigned to from the Calendar settings. Clicking the pencil icon (eyeball icon if you are a reviewer), selects that event and switches to the ‘Attribute’ tab.

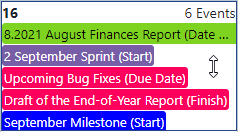
If a day which has more events on it than can be shown on the Calendar is selected, the number of events on that day is displayed in the top right corner. Hovering over the events on that day allows the user to use the mouse to scroll up/down to view the other events.
To jump to a specific month, simply click on the Calendar header to open a window where you can select the desired month and year for the Calendar to navigate to.


Users can choose a specific task on the calendar for modification. Additionally, users have the option to select a day, so the 'Day' Tab shows up on the left sidebar. This allows users who's calendar has one or multiple tasks to focus on specific tasks scheduled for that day.
Create a New Event
![]()
Selecting 'New Event' will create a new event for the Calendar. Upon selecting it on the toolbar, a window will appear to define it's Class, Name, Number, Description, Date(s) and Attributes.

Calendar Reports

Users have the option to download a PNG, HTML Image, or DOCX image of the displayed month from Calendar View by using the Reports button on the toolbar.
To continue learning about Charts Dashboard, Click Here.
(Next Article: XY Plot)