
Innoslate offers a variety of reports for users to access in Document View as detailed in the table below. Below is a summary of the reports accessible in the Document View, including examples of the output for reference.
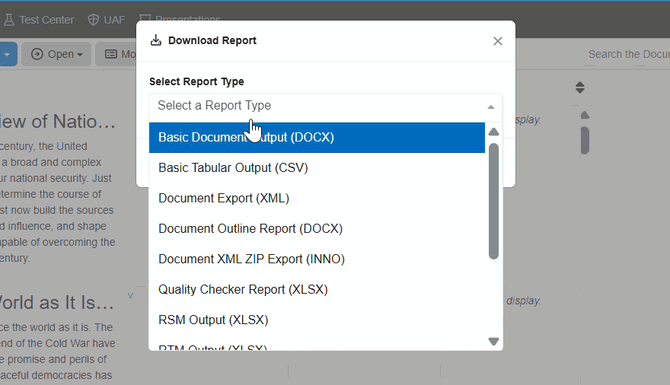
These comprehensive reports can be conveniently accessed by clicking on the 'Reports' button located on the top toolbar of Innoslate's Document View.

When a window appears with a dropdown to select the desired report.
Please keep in mind that the reporting from this view is limited to the entities included in the corresponding document's view. Documents View only show the Statement class and subclasses of Statement, like Requirement. If you need to generate a report on additional entity classes not included in the document, please use the Reports out of Database View or Compilations View.
Basic Document Output (DOCX)

The Basic Document Output is generated in DOCX format and includes the entities and their associated attributes in the current view when the report is generated (to modify the view to include pertinent data into this report, please click here).
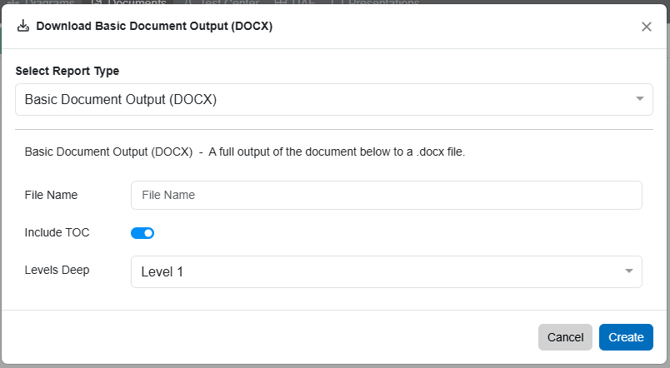
Upon selecting the Basic Document Output option the pop up will change to give this file a name.
Toggle on 'Include TOC' to add a Table of Contents (v4.14) and select how many children levels you'd like the Table of Contents to have.
Select 'Create' to generate the report.
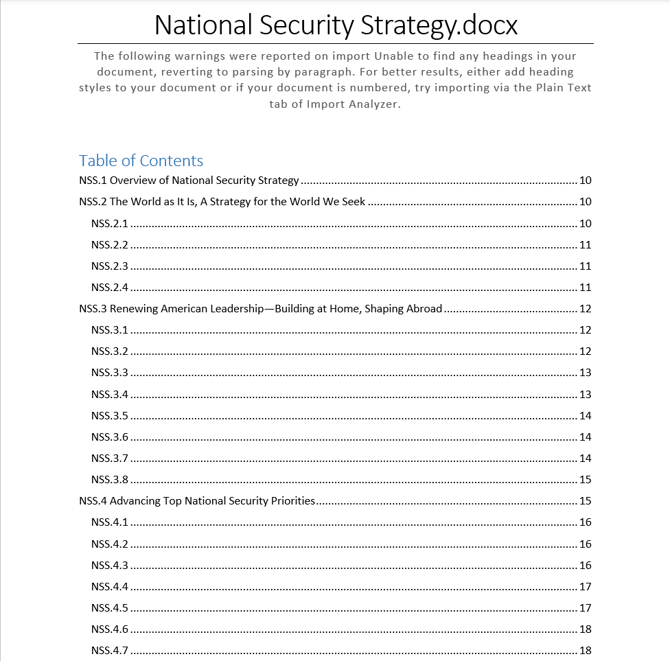
Below is a Basic Document Output sample:

Adding a Table of Contents (TOC) in Innoslate v4.14
In Innoslate version 4.14, you can now generate a Table of Contents with up to 6 levels of depth when exporting documents to Microsoft Word (.docx).
-
How to Include a Table of Contents:
-
In the export settings, enable the Include TOC toggle.
-
Select the desired number of levels for the Table of Contents.
-
The number of levels typically corresponds to the depth of your document’s heading hierarchy.
-
After exporting the document to .docx format, open the file in Microsoft Word.
-
Click Enable Editing to allow the Table of Contents to fully render and display correctly.
Note: The TOC depth should be chosen based on the hierarchy structure used in your document for best results.
Updating the Table of Contents
Depending on your version of Microsoft Word, the Table of Contents may not display correct page numbers immediately after opening the document (for example, all entries may show “Page 1”).
If this occurs:
-
Click anywhere inside the Table of Contents (or highlight the entire TOC).
-
Right-click and select Update Field.
-
In the dialog box, select Update pages only and click OK.
The Table of Contents will refresh with the correct page numbers.
Tip: You can quickly update the TOC at any time by placing your cursor inside it and pressing F9 on your keyboard.
Basic Tabular Output (CSV)

The Basic Tabular Output is a CSV output of the document's entities (rows) and selected attributes (columns).
Upon selecting the Basic Tabular Output option the pop up will change to allow users to select from many options to include in the CSV Output. In the image below, the 'Include' dropdown will automatically display the attributes that are currently shown in the view when the report is selected.
Users have the flexibility to add or remove additional columns to their CSV output and can choose to include all attributes, comments, metadata, relationships and more. The image below displays all available options.

Users have the option to sort the entities. The report is set to hierarchical by default but can choose to sort them by name, number, class, or ID.
Enter the desired 'File Name' and select 'Create' to generate the report.

Below is a sample of the Basic Tabular Output.

Comment Report

The Comment Report provides users a XLSX file of all comments made on the entities in the document, regardless if they have been resolved or unresolved. This report is helpful for keeping track of discussions and ensuring that all comments are addressed appropriately.
Upon selecting the 'Comment Report' option in the 'Reports' dropdown, the popup will change to allow users to select the data they'd like to include in this report. By default, all options are already selected. To omit an option, users can select the blue 'X' next to the option as indicated in the picture below with the red square.

Below is a snapshot of the Comment Report output.

Document Export (XML)

The Document Export XML provides users an output of the document in XML format. This is particularly useful for importing into another Innoslate project.
Once users select the 'Document Export XML' option, the pop-up window will appear, allowing users to customize the options to include in the XML. By default, all options are selected. To exclude any options from the XML, simply click the blue 'X' next to the desired option.

Below is a sample snapshot of the XML output viewed in Chrome.

Document Outline Report (DOCX)
.png?width=408&height=358&name=Document%20Outline%20Report%20(DOCX).png)
The Document Outline Report generates the entire hierarchy of the document outline. Only the number and name are extracted in DOCX format. Upon selecting the Document Outline Report option the pop up will change to give this file a name. Select 'Create' to generate the report.
%20Name.png?width=670&height=294&name=Document%20Outline%20Report%20(DOCX)%20Name.png)
Below is a Document Outline Report sample:
%20Output.png?width=480&height=519&name=Document%20Outline%20Report%20(DOCX)%20Output.png)
Document ZIP Export (INNO)

The Document Zip Export (INNO) output is a compressed file designed to include images and files associated with the document. This file format is specific to Innoslate and is intended for seamless importing into Innoslate.
Upon selecting the 'Document Zip Export (INNO),' the pop up will appear so users can select or omit which options to include in the export. By default, all options are automatically selected.

Post Baseline Change Report (XLSX)

The Post Baseline Change Report is an output of all the baselines and changes made to the document's entities since that baseline as a .xlsx file.
After selecting the 'Post Baseline Change Report', a pop-up will appear where users can provide a 'File Name' and generate the report with the 'Create' button.

Below is a sample of the Post Baseline Change Report. Note, the left side are the baselined entities, where the right side indicates the modifications to the entities. Users may also look at this per baseline as indicated with the bottom tabs of Excel, as indicated below in the red square.

Quality Checker Report

The Quality Checker Report is an output of your most recent Quality Check results as a row-by-row breakdown of the results by requirement followed by the attribute results.
After selecting the 'Quality Checker Report', a pop-up will appear where users can include Created By, Created On, Entity URL, Global ID, Labels, Modified On, Modified By data. Provide a 'File Name' and generate the report with the 'Create' button.

Here is a sample of the Quality Checker Report. The left columns display the requirement details (number, name, and description), while the right columns show the overall Quality Score for each requirement, followed by the specific attribute evaluated, any associated message, and the result (Yes/No).

Requirements Satisfaction Matrix (RSM) Output (XLSX)

The Requirements Satisfaction Matrix provides a comprehensive table that displays the document's entities along with the corresponding entities that satisfy those entities as a .xlsx file. Please keep in mind that for the related entities to appear, it is necessary to establish the relationship of 'satisfied by' between the document entity and another entity.
Upon selecting 'RSM Output (XLSX)' the pop up will change to select what 'Requirement Attributes' and 'Satisfied Entity' attributes to include in the export. Below is a snapshot of all the possible attributes to choose from. To omit any attributes, simply click the blue 'X' next to the attribute. After giving it a 'File Name,' press 'Create' for the export.

Below is a snapshot of the RSM Output. Notice the left side indicates the entities in the document, the right side under the 'satisfied by' column indicate the entities that satisfy the entities on the left.

Requirements Traceability Matrix (RTM) Output (XLSX)

The Requirements Traceability Matrix is a table of the document's entities with the entities that are traced to those entities as a .xlsx file. Please keep in mind that for the related entities to appear, it is necessary to establish the relationship of 'traced to' between the document's entity and another entity.
Upon selecting 'RTM Output (XLSX)' the pop up will change to select what 'Requirement Attributes' and 'Traced Entity Attributes' to include in the export. Below is a snapshot of all the possible attributes to choose from. To omit any attributes, simply click the blue 'X' next to the attribute. After giving it a 'File Name,' press 'Create' for the export.

Below is a snapshot of the RTM Output. Notice the left side indicates the entities in the document, the right side under the 'traced to' column indicate the entities that trace to the entity on the left.

Requirements Verification Matrix (RVM) Output (XLSX)


Requirements Verification Traceability Matrix (RVTM) Output (XLSX)


Requirements Interchange Format Output (REQIF)

The Requirements Interchange Format (ReqIF) is an exchange file format for exchanging requirements, attributes and additional files (e.g. images) across various Requirements Management Tools.
Upon selecting 'ReqIF,' the pop up will change to allow users to name the file. Select 'Create' for the export.

Verification Cross-Reference Matrix (VCRM) Output (XLSX)

The Verification Cross-Reference Matrix is a table identifying each requirement verification method(s) in XLSX format. Please keep in mind that for this output, the appropriate labels (such as 'Analysis' Demonstration' Inspection' etc.) must be applied to the document's entities.
Upon selecting 'VCRM Output (XLSX)' the pop up will change to select what 'Requirement Attributes' and 'Verification Methods' to include in the export. Below is a snapshot of all the possible attributes to choose from. To omit any attributes, simply click the blue 'X' next to the attribute. To add an attribute, simply select the attribute in the corresponding dropdown. After giving it a 'File Name,' press 'Create' for the export.


To continue learning about Document View, Click Here.
(Next Article: Document Indicators)