
Innoslate’s workflow controls allow an entity’s status to be transitioned through a lifecycle. Workflow has the ability to control permissions of the transition, locking, and generating email notifications.

Innoslate includes a standard requirement and issues workflow with every project. These default workflows are based on CMMI (Capability Maturity Model Integration) and are designed as a starting point. The default workflows can be changed to suit your project’s needs.
-
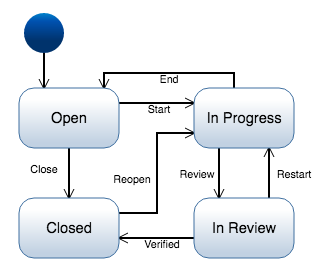
Default Issue Workflow
-
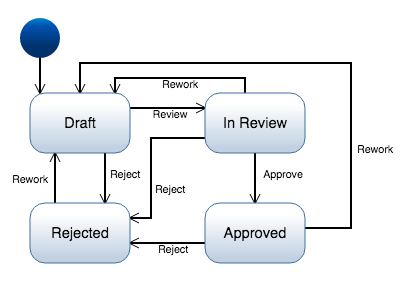
Default Requirement Workflow
Customizing a Workflow
- Adding a Class: A new class can be added to the workflow by clicking the ‘Add Workflow Class’ button. Any class with an enumeration attribute can be added to a workflow.
- Adding a Transition: A transition allows controlling the entity’s state. Click the ‘Add Transition’ drop-down and select the state you would like to transition to.
- Transition Notifications: Any user or team can receive a notification when a transaction is reached. Multiple users and teams can be added to the notification list. Click ‘Select user/team’ under ‘Notifications’ to add a user or team to the notification list.
- Transition Permission: By default, all users have permission to transition from one state to the next. Innoslate allows restricting transitions to specific users and/or teams. To restrict a transition, click ‘Select user/team’ under ‘Permissions’ to add a user or team.
- Locking Transitions: Once a final state has been reached (ex. closed/approved), an entity can then be locked from editing. To lock an entity at a transition, check the ‘Locked’ checkbox. Entities can be unlocked by project owners in “Database or Entity View.”
Workflow & Email Notification Rules
Innoslate keeps you informed about your projects through email notifications. Here’s how they work:
Status Changes: You’ll receive an email when the status of an entity you follow (e.g., one you’ve edited) or created changes.
Workflow Updates: If you’re on a workflow’s notification list, you’ll get an email whenever the associated entity’s status is updated.
Change Requests & Comments: Get notified by email when a change request or comment is made on an entity you created or modified.
Tutorial Video
To continue learning about Schema Editor, Click Here.
(Next Article: Computable Attributes)