
The 'Computable' attribute allows users to define attributes from any class whose attribute values can be computed. This can be useful for performing calculations, aggregating data, or creating derived values.
To use the 'Computable' attribute data type, users can define an equation using the built-in functions and operators provided by Innoslate. These equations may reference other attributes within the same entity or across different entities.
It is vital to note it can calculate number, text, duration, percentage or the result of another computable data types.
| Applying a Computable Attribute | How to add a Computable Attribute. |
| Applying an Equation to the Attribute | How to set an Equation in your Computable Attribute. |
| Updating the Value | How to update the Value of your Computable Attribute. |
How to add the Computable Attribute into your Innoslate project
To add the Computable Attribute, follow these steps:
1. Navigate to the Schema Editor in an Innoslate project.

2. Select 'Class' on the left sidebar.

3. Select the desired 'Class.'

4. Scroll down to the Attributes table and click the blue 'Add Attribute' button on the far right.

5. A new row for the Attribute will appear on the Attributes Table. Users will then want to fill out a name for their computable attribute, select the Computable data type, and the number of the order they'd like to see the attribute appear in.

6. From here, users may select the blue caluclator icon in this row to set a default equation to be used for that Class or leave it blank so users may set an equation on the entity level. If inputting a default computation for the Class, follow the steps in the next section titled, 'Inputting an Equation in the Computable Window,' however, be sure to take note of Step 7 below before navigating to that section.

7. Be sure to select the green Save button on the top of the page after adding the Computable attribute. This will ensure to add the attribute to the selected Class.

Setting Default Entity Computables
Setting an equation at the Schema Editor level (Step 6) establishes a class-wide default computable attribute for all entities belonging to that Class. To set equations for individual entities instead, configure them directly within the designated entity's attribute.
Inputting an Equation in the Computable Window
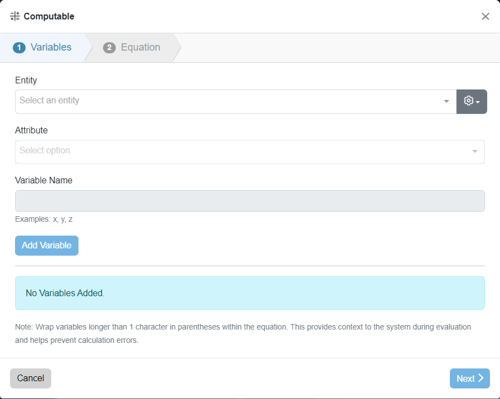
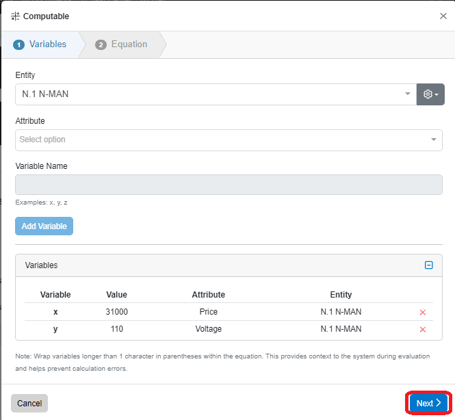
First, users must add the attributes they desire to include in their equation and give them a variable name. To do this, use the following steps:
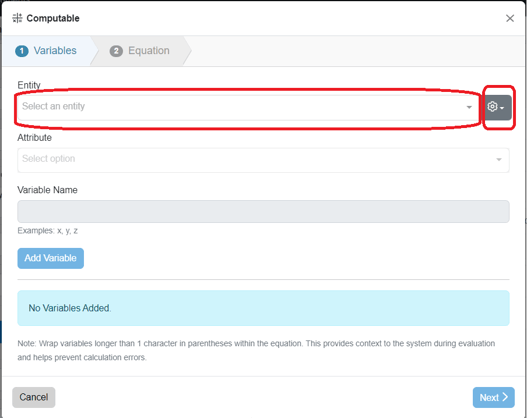
1. Select the Entity with the dropdown field. The gray wrench icon to the right of the entity dropdown can be used to recall entities from other projects.
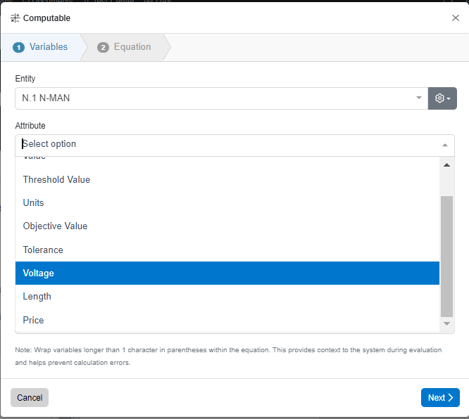
2. Choose the attribute of the entity to include in the equation.
3. Type the variable name for the attribute in the Variable Name field and select 'Add Variable'.
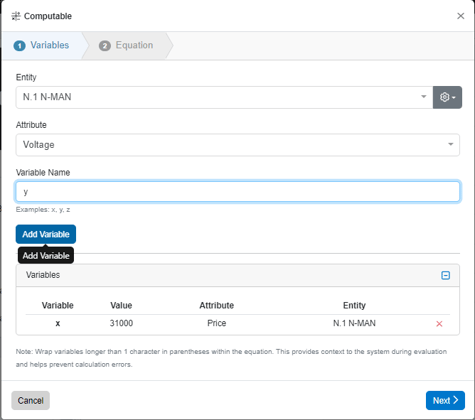
4. The variable will now be added in the Variables Table below the 'Add Variable' button. The fields above will blank out so you can include more entities, attributes and their variables. Repeat steps 1-3 to keep including the desired variables from the various entity attributes as needed. Then click the blue Next button, on the bottom right, to begin the process of creating your equation.
Note, there is no limit to how many variables users can apply here. However, if there are a lot of variables, the computation may be slower.
5. Step 2 in the Computable Window is where users can input the equation via plain text input or via LateX. Select desired tab for equation input.
Select resulting units that will be used to compute the value of the variables created in Step 1. The equation field and resulting units are highlighted in the picture below. Note the 'Copy to Clipboard' button to the right of the Equation field for user's convenience to paste elsewhere.

Some guidelines to consider at this step:
- Wrap variables longer than 1 character in parentheses within the equation. This provides context to the system during evaluation and helps prevent calculation errors.
- Multiply and divide durations cautiously. All duration units are converted to the Computed Duration Units selection.
- The Equation field is presented in LaTeX format, and using the backslash \ in the Equation field allows for the use of this editor. It is important to note that full LaTex integration is not currently supported.
- Unsupported characters are anything that isn't a number, letter or basic math operators +,-,*,/, ^ (exponents), () parentheses.
- Some trigonometry functions can be computed in radians, not degrees.
- Supported LaTeX calculations:
- π:
\pi
- √:
\sqrt
- π:
* For more on LATEX Mathematical Symbols, refer to this link for more commands and constructs.
6. To obtain the result of the computation, click on the blue 'Compute' button, as shown above. Below is an example of how the results will appear after. Note, users may indicate their desired decimal places with the buttons to the right of the result.

7. Click 'Finish' to complete the calculation.
8. If the Computable modal was being used in an entity, be sure to press Save in that view. Below is an example of this from Entity View.

Updating the Computable
When a computation has already been made and the attributes to a variable in the equation have changed, the Computable will sense this when selected. As displayed below, a blue message will pop up on the top of the window advising the user a variable has changed and the result may be updated on the Equation step.
1. To update the result, select 'Next.'

2.Select 'Compute' on the Equation Tab to update the result.
3. Click 'Finish' to update the Result.
Pro-Tip: Quick Recompute > Bypass the dialog window entirely by clicking the down arrow next to the Compute button and selecting Recompute.
Display Options

To quickly preview how an equation is set up without opening the full editor:
-
Click the dropdown arrow next to the Compute button.
-
Choose Show Equation or Show LaTeX to view a quick snapshot of the underlying formula.
Note: Selecting these display options will not change the attribute's primary view. The Computable attribute is designed to always display the computed total as its default value.
To continue learning about Computing Tools, Click Here.
(Next Article: Rollup Tool)