
Sections Available in the Scripting Guide
| Function | Description |
|---|---|
| Innoslate Simulators | Discover the capabilities of Innoslate Simulators, empowering you to simulate and analyze complex systems and other applicable utilities. |
| JavaScript Basics | Learn how to utilize JavaScript basics in the Innoslate Scripting Guides, enabling automation and customization of simulations. |
| Pre-Built Scripts | Discover pre-built scripts in the Innoslate Scripting Guides to quickly apply common simulation functionalities and save development time. |
| OR Decisions | Learn how to implement OR decisions in your simulation scripts to create conditional branching and decision-making scenarios. |
| API Advanced Simulation | Explore advanced simulation capabilities through the Innoslate API in the Scripting Guides. |
| Using I/Os | Master the usage of inputs and outputs (I/Os) in the Innoslate Scripting Guides, between simulation scripts and external systems. |
1 Innoslate Simulators
Innoslate’s discrete event and Monte Carlo simulators require little scripting for most applications. The logic execution uses the decision points and Input/Output (I/O) triggers for basic problems, but for more complex simulations you will want to learn how to add scripts, which will range from minimal to complex.
2 JavaScript Basics
JavaScript was initially created to “make web pages alive”. The programs in this language are called scripts. They can be written right in a web page’s HTML and run automatically as the page loads. Scripts are provided and executed as plain text. They don’t need special preparation or compilation to run. The syntax for JavaScript is shown.
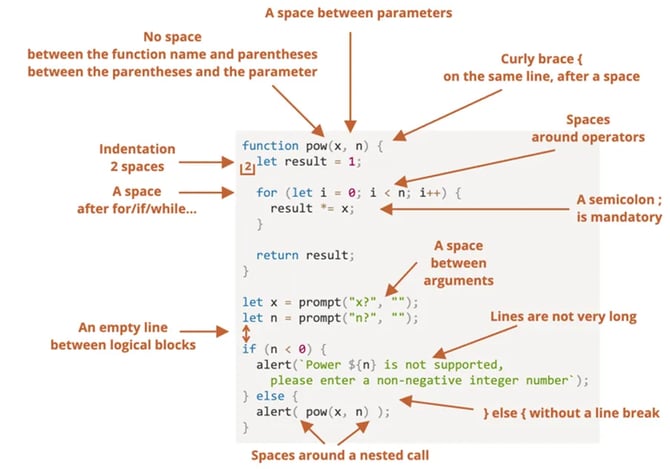
Image 1: Script Basics
For adding to Innoslate scripts, note the use of “let” to define a variable. Innoslate script allows either “let” or “var” to define variables. Comments can also be added using two backslashes (//). Also “print()” statements can easily be added. These statements print to the Innoslate simulator console.
3 Pre-Built Scripts
The OR and LOOP decision points (special cases of the Action) already come with pre-built scripts (Probability and Resource for both and Iterations for the Loop). These can be used without any scripting on your part. Just select the script type you want, adjust the values, and submit the script, then we generate the script automatically. More on these basics here: Executing your Action Diagram
The code behind each decision point’s script type can be accessed by selecting ‘Script’ from the drop-down menu. An example of each is shown in the later sections below.
3.1 OR Script
3.1.1 OR Probability
The user selects “Or Probability” from the drop-down menu, as seen, then the user can adjust the branch probabilities, in this case making Yes is 70% of the time and No is 30%.

Image 2: Or Probability UI
The script that is generated is shown. Note that the comment line at the top contains the information shown in the user interface above. The comment list each branch's ID number with its corresponding assigned percentages. If changes are made it is recommended to either update assigned percentages or delete it.
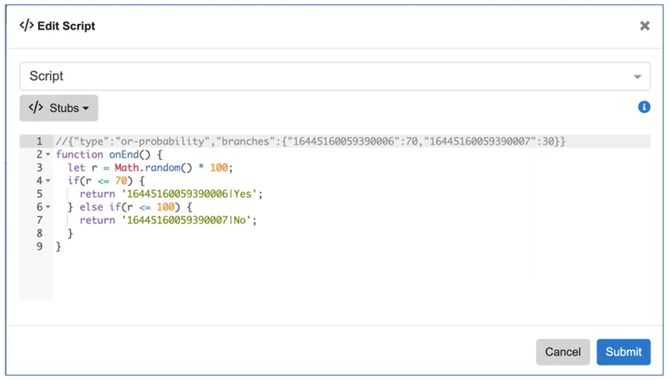
Image 3: Or Probability Script UI
3.1.2 OR Resource Script
The Or Resource script will use Resource entity attributes such as its Amount to be set and used as a condition for the Or Resource script. A Resource entity must be created first and available in the database. The branch options include logical constructs and values. This shows the user interface for the Or Resource script.
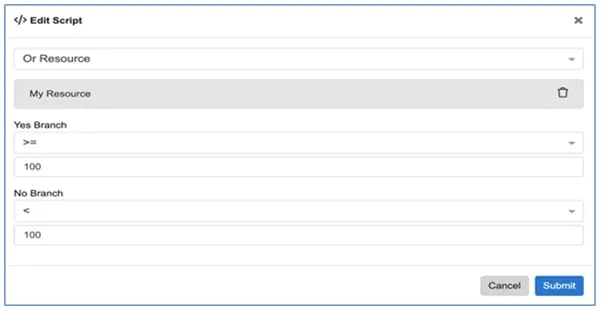
Image 4: Or Resource UI
These options will be used to compare the Resource amount at the time the script is executed. This shows the resulting script from this selection. Note that the Global ID is used for getting the Resource from the database (using the Rest API: Sim.getAmountByGlobalId()). More on this is provided in the Advanced Simulator Scripting section.
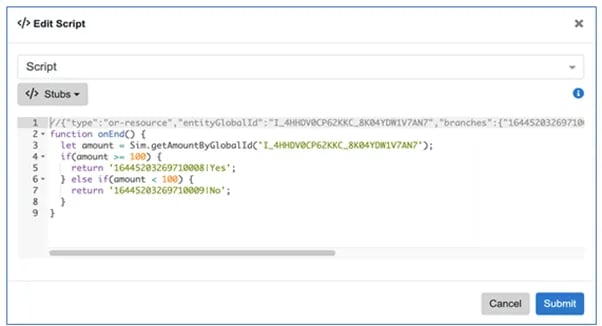
Image 5: Or Resource Script UI
3.2 Loop Script
3.2.1 Loop Probability
Loop Probability will be based on the percentages set by the user. In this figure we changed the default probabilities from 50/50 to 80/20 between the Continue and Exit branches.
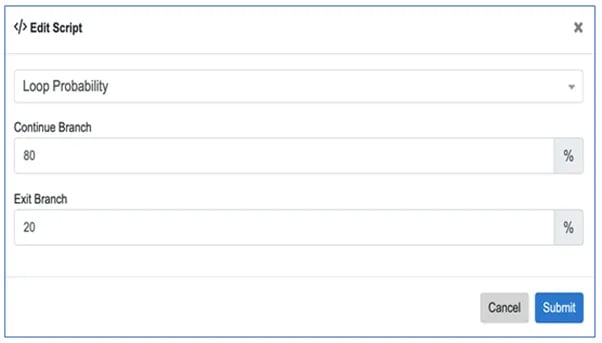
Image 6: Loop Probability UI
This shows the generated script. The script allows the simulator to stay in the Continue branch because of the condition, “r <= 80”. If the condition is not met the simulator will leave on the Exit branch.
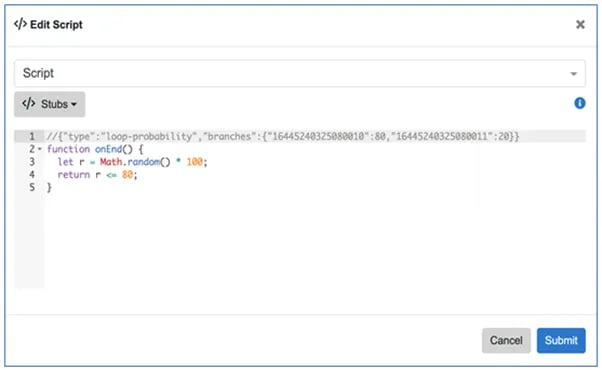
Image 7: Loop Probability Script UI
3.2.2 Loop Resource
The Loop Resource is similar to the Or Resource, except the condition is based on the Resource’s amount value. Figure below shows the user interface for the Loop Resource.
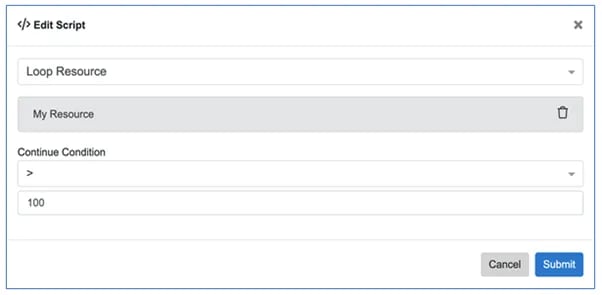
Image 8: Loop Resource UI
This references the Resource construct in the script by using the REST API, “Sim.getAmountByGlobalId()”, and Resource’s Global ID.
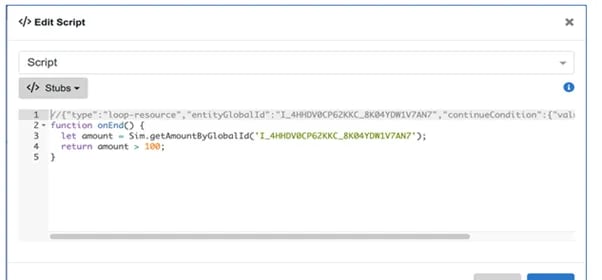
Image 9: Loop Resource Script UI
3.2.3 Loop Iteration
The Loop Iteration script allows to user to tell the simulator amount of times the loop should run. Figure below shows the Loop Iterations user interface. We changed the number of iterations from the default value of 3 to 10.
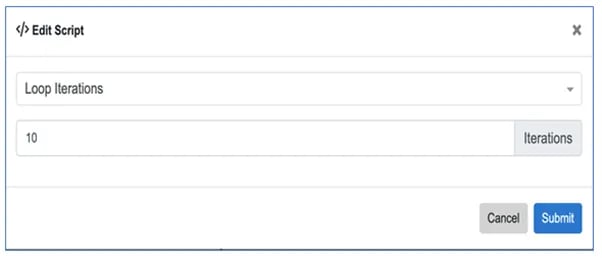
Image 10: Loop Iterations UI
Figure below shows the resulting script. Note that the “i” variable is initialized to zero outside the function and then “i” is incremented each time this function is called.
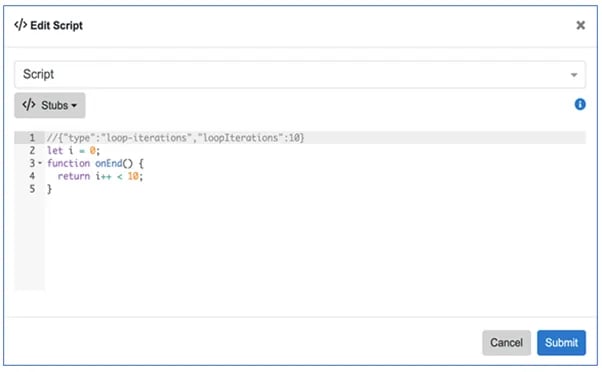
Image 11: Loop Iterations Script UI
It is recommended to start with these if you are building a new script, as it will often be easier to get the exit branch identifier automatically. Note that the branch identifier is not essential for the script and if you want to reuse (copy and paste) the script into other Actions/Decision Points, then you will want to eliminate them.
We also provide “stubs” for those needing to develop scripts from scratch for onStart(), onEnd(), and prompt(). At this point, you will need to know a little JavaScript to write executable programs. Note that prompting the user only works with the discrete event simulator and will throw an error in the Monte Carlo simulator.
One more common situation is the need to make sure that decision points are synchronized with other decision points. The next section discusses this situation.
4 Synchronizing OR Decision
Often we need to make sure that when a decision is made by one Asset that another Asset uses that decision to go down a particular path. We can see this in the diagram example below.
To replicate the examples and experiment hands-on, download the demonstration diagram provided here and upload it to your Innoslate workspace: Parallel OR Synch Diagram
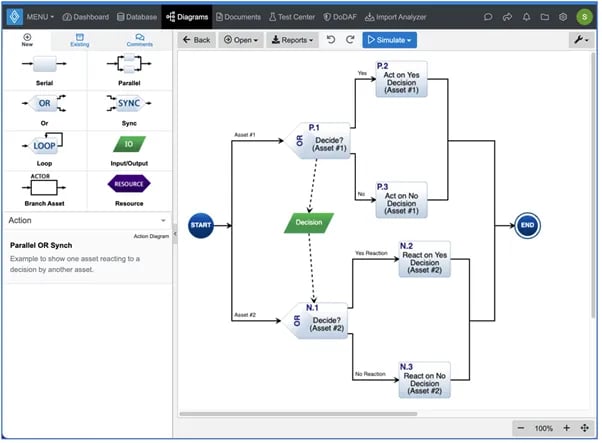
Image 12: Action Diagram with 'OR' Asset Branches
In this diagram, the first asset makes a decision using a standard probability script. We want the second asset to respond to that decision and go down a similar path. For this to execute properly, we need to trigger the second decision point from the first, i.e. to ensure that the second decision point does not try to execute at the same time as the first one (which it would do without the “Decision” Input/Output entity.
But we also need to pass on to the second decision point what the decision was (yes or no in this case). This synchronizing of the decision can be accomplished by setting a JavaScript global variable or putting a “Yes” or “No” in the Input/Output attribute field. Let’s look at the first one.
Figure below shows the first decision point [Decide? (Asset #1)], where it starts with the standard probability script. Then we added the “globals.set” and “print” lines.
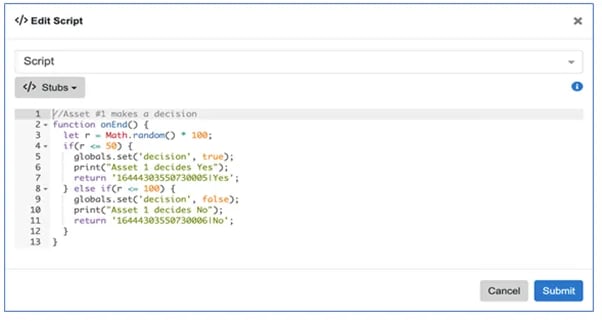
Image 13: Script with 'OR' Asset Branch #1
For Asset #2’s OR script, retrieve the value with:
var decision = globals.get("Decision");
Then use
if (decision === "yes") { ... }
instead of probability. We also added print statements to show it went down the correct path.

Image 14: Script with 'OR' Asset Branch #2
The results for a yes decision are shown.
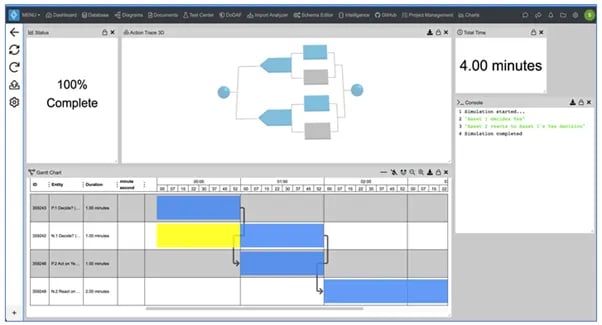
Image 15: Simulator Results for 'Yes'
The results for a no-decision are shown.
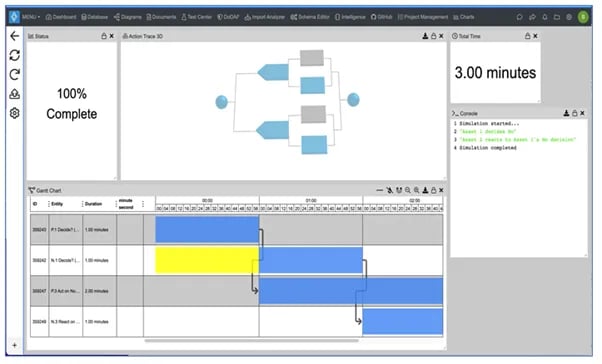
Image 16: Simulator Results for 'No'
Note: Older scripts may use globals.put("Decision", "yes") instead—it still works (via compatibility remapping), but use globals.set for new or updated code to match current standards.
Global Variables (globals Map) Best Practices
Innoslate's simulation engine provides a globals object — a simple key-value store (Map-like) — for sharing arbitrary data across scripts during a run. Use it for flags, decisions, experiment parameters, temp counters, etc.
Recommended API (Current & Preferred):
//Sets or updates the value for a string key.
globals.set(key, value)

//Retrieves the value (returns undefined if key doesn't exist;
//Consider defaults like globals.get("key") || defaultValue).
globals.get(key)
Example in JavaScript:
// In one decision point's script (e.g., onStart or decision logic)
globals.set("TestModeEnabled", true);
globals.set("MaxIterations", 50);

// In another script let enabled = globals.get("TestModeEnabled");
if (enabled) { /* special logic */ }
Legacy / Backwards Compatibility Note
Older Innoslate simulation scripts (from classic/earlier engine versions) may use:
globals.put("key", value);
This still works today — the engine automatically remaps .put to .set for compatibility with legacy code (updated in v4.11). However:
-
.put is legacy/deprecated-style (influenced by Java's Map API in early implementations).
-
Always use globals.set in new scripts, refactors, or team standards — it's the native JavaScript Map method, matches current docs/examples, and ensures future-proofing.
-
No behavioral or performance difference exists now; the remapping is seamless.
Additional Tips:
-
Keys are strings — prefer descriptive ones like "FuelLow", "DecisionPhase2", or "DOE_FanSpeed_RPM" (as seen in DOE examples).
-
Globals persist for the entire simulation run but reset between separate runs.
-
For debugging: Use the Global Tracker panel in the Discrete Event Simulator UI to monitor live changes to globals.
-
Avoid overusing globals for entity data — prefer dedicated APIs like Sim.get/setResourceByName/GlobalId or I/O entities for resources/values (more traceable and less error-prone).
-
Combine with print (globals.get("key")) for console logging during testing.
5 Advance Simulator Script using API
The simulator ha a scripting API (Sim) to allow users to gain access to data contained in the model being executed. To use many of these APIs, you need to provide the Global ID or project-level ID. These IDs can be found when selecting an entity in the Metadata tab on the sidebar.
Sim is a utility class that references methods used to access simulation objects during simulation. The figure identifies each of the functions available in the Sim API and what they return by category.
Entity Lookup Functions
These retrieve one or more entities (actions, assets, etc.) by different identifiers.
| Function | Description |
Sim.getEntitiesByNumber(number) |
Returns a list of entities based on entity number. |
Sim.getEntityByNumber(number) |
Returns the first entity based on entity number. |
Sim.getEntitiesByName(name) |
Returns a list of entities based on entity name. |
Sim.getEntityByName(name) |
Returns the first entity based on entity name. |
Sim.get(name) |
Shorthand alias for
Sim.getEntityByName(name) |
Sim.getEntityById(id) |
Returns an entity based on its entity ID. |
Resource Management Functions
These handle reading and updating resource amounts (e.g., inventory, fuel, budget).
| Function | Description |
Sim.setResourceByName(name, amount) |
Sets the resource's current amount based on resource name. |
Sim.setResourceById(id, amount) |
Sets the resource's current amount based on resource ID. |
Sim.getResourceByName(name) |
Returns the first resource based on its name. |
Sim.getAmount(name) |
Returns the resource amount based on resource name. |
Sim.getAmountById(id) |
Returns the resource amount based on resource ID. |
Simulation State Queries
These get read-only info about the current simulation run (time, cost, etc.).
| Function | Description |
Sim.getCurrentCost() |
Returns the current cost of the simulation. |
Sim.getCurrentTime() |
Returns the current time of the simulation. |
Input/Output (I/O) Value Functions
These access the Value attribute on I/O entities for data passing between simulation elements.
| Function | Description |
Sim.getIOValueByNumber(number)
|
Returns the Input/Output value attribute based on entity number. |
Sim.getIOValueById(id)
|
Returns the Input/Output value attribute based on entity ID. |
Sim.getIOValueByGlobalId(globalId)
|
Returns the Input/Output value attribute based on entity global ID. |
External HTTP Integration Functions
| Function | Description |
Sim.httpGet(url) |
Performs a synchronous GET request to fetch data from an external server. |
Sim.httpPost(url) |
Performs a synchronous POST request to create data on an external server. |
Sim.httpPut(url) |
Performs a synchronous PUT request to update data on an external server. |
Quick Tips on Usage Patterns
-
Entity lookup is the foundation — use name/number for quick prototyping, IDs/global IDs for robust/large models.
-
Resources are the most common scripted element — prefer Sim.getAmount(name) / Sim.setResourceByName(...) for simplicity, or ID-based for performance/safety.
-
I/O values shine in decomposed diagrams or data flow between actions.
-
HTTP functions are advanced — use them sparingly (synchronous = blocks simulation clock), and handle errors (e.g., check response).
Note that the tables are missing two methods:
Sim.getResourceByGlobalId(GlobalID)
Sim.setResourceByGlobalId(GlobalId, amount)
These objects include:
- Entities (Actions, Resources, I/Os, Conduits, Assets, Cost)
- Current Time
- HTTP Request
You can use these functions to get the names, numbers, descriptions, and any other related attributes of any of the entities available within the simulation. The entities are limited as the simulator only loads information on the entity classes listed above. The example below shows how to use these functions for Cost and Time. Figure below shows Actions that incur Costs. The picture shows a simple Action Diagram with two Actions.
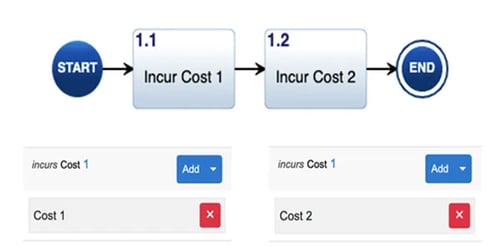
Image 17: Incur Cost Diagram and Relationships
The Action Diagram shows the incurs relationship and Cost entities for each Action. If you add the script into the Action diagram and then execute it, you will see the results in the final figure.
To replicate this example and experiment hands-on, download the demonstration diagram provided here and upload it to your Innoslate workspace: Cost and Time Diagram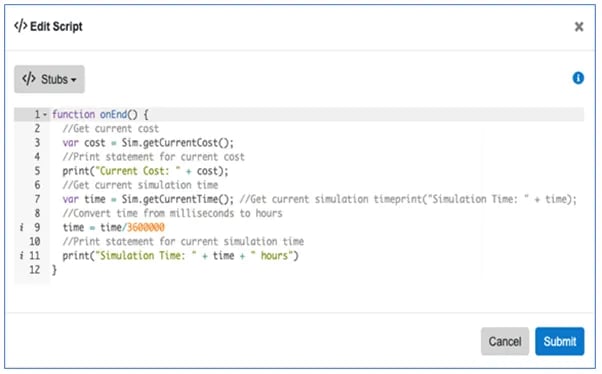
Image 18: Incur Cost Script UI
Image 19: Incur Cost and Get Time Script UI
5.1 Using Resources in Simulators
Previous figures showed the predefined scripting capabilities in the OR and LOOP actions. These figures show how the pre-built scripts access the current amount of Resources identified by their GlobalIDs. These IDs are found in the Metadata tab of the entity view on the Action Diagram sidebar for the Resource, as seen. The scripts are able to be manipulated via user-defined scripts of an action and then plotted during the simulation.
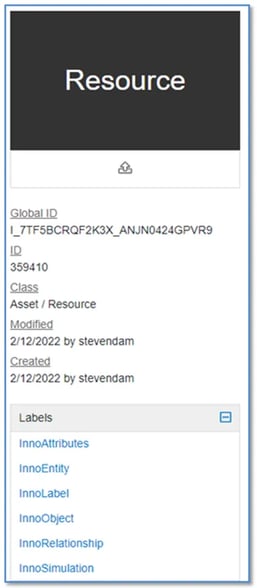
Image 20: Resource Metadata tab
Important information about attributes of a Resource:
Resource Entity View
Value of Resource not being between Minimum and Maximum Amount will cause the simulation to deadlock (break).
Relationships created between Actions and Resources allow for Pre-Defined Scripting to:
- produces Resources
- consumes Resources
- seizes Resources
Either the produces or seizes relationship can be selected when you drag from a green circle on a highlighted Resource onto an Action, an overlay of the two options will be provided. If you select seizes the Resource icon will turn a lighter purple and the lines will have a “seizes”. This example shows an example of the produces relationship. Click on each Action Entity and go to ‘Relationships’ on the side panel, find the ‘produces’ relationship, and define the amount to produce.
To replicate the example and experiment hands-on, download the demonstration diagram provided here and upload it to your Innoslate workspace: Resource Diagram Example
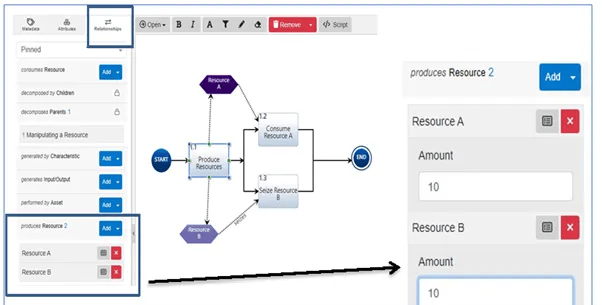
Image 21: Produce Resource Diagram Example
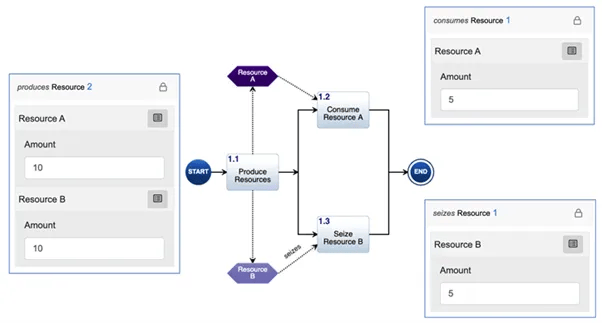
Image 22: Consumes Resource Diagram Example
This figure shows the results of the simulation. The consumed amount of the Resource is permanently taken away from the Resource, while seized amount only takes away from the Resource during an Action’s duration.
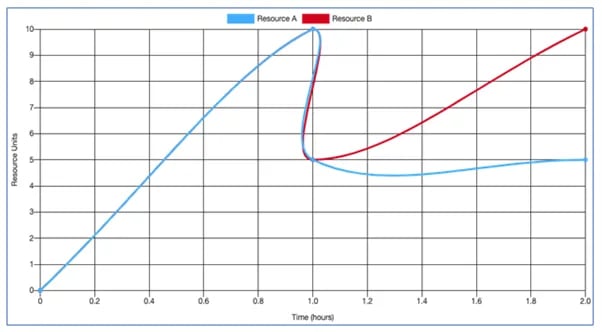
Image 23: Resource Graph
Scripts can also be developed to change resources, with or without the Resource being directly associated with the Action.
To replicate the examples and experiment hands-on, download the demonstration diagram provided here and upload it to your Innoslate workspace: Resource Manipulation Diagram
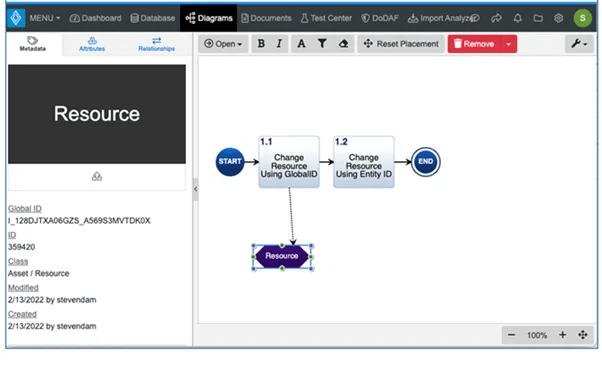
Image 24: Resource Diagram Example
For this example, we had the Action produce 20 units (remember units are arbitrary and must be consistently set) of the Resource using the attribute on the produces/produced by relationship. The scripts for the Actions are shown below:

Image 25: Resource Script and Diagram Example
The resulting simulation output is shown. Note that the produces relationship incrementing of the Resource occurs before the execution of the onEnd() script. So the net effect of the first script is to reduce the amount to 10 units from the original 20. The second script reduces the amount of the Resource by another 5 units.
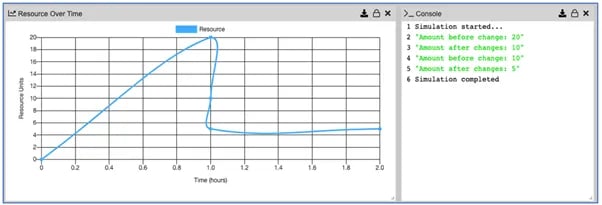
Image 26: Simulator Example
5.2 Using Scripts Prompts
The Innoslate simulator can help conduct tabletop exercises, and develop standard operating procedures, and Concepts of Operations. These applications simulate how users may respond to different events and how the system reacts to the user’s input. As such, scripts to prompt the user for input have also been provided. This table below shows the prompt script methods and their purpose.
| Function | Description |
addEnumInput(title, name, choices, value) |
Prompts user to choose from set of predefined choices. |
addInput(title, name, value) |
Prompts user to enter text. |
addBigTextInputText(title, name, value) |
Prompts user to enter a large amount of text. |
addNumberInput(title, name, value) |
Prompts user to enter a number. |
addBooleanInput(title, name, value) |
Prompts user to choose from True/False. |
setTitle(title) |
Sets the title of the prompt. |
Note these prompts may only be used with the Discrete Event Simulator. If these prompts are enabled during a Monte Carlo simulation the user will receive an error message.
An example of using this prompt is shown. The prompt method automatically returns the “response” variable to the script, so that the user only needs to use the onEnd(response) function call.
To replicate the example and experiment hands-on, download the demonstration diagram provided here and upload it to your Innoslate workspace: Resource Prompting Diagram

Image 27: Resource Sim Prompt
6 Advance Simulator Scripting Using ‘Inno’ API
The “Inno” APIs consist of the following methods: InnoObject, InnoEntity, InnoAttributes, InnoSimulation, InnoRelationships, and InnoLabels. These methods can only be used with the entity classes directly related to the instances included in the simulation. They cannot manipulate other classes within the database, such as Risk, Time, Measures, etc. Any changes to the attributes, relationships, and labels are only temporary and contained within the simulation. This limitation is a security feature that makes database corruption impossible. It also is essential for cyber security in a cloud environment. To make database changes, you can use the general JavaAPIs with the Enterprise version of Innoslate.
The following subsections discuss each of these methods and their usage.
6.1 InnoObject Methods
InnoObject methods enable the user to get and set most of the common attributes of any object (Name, Description, Created and Modified Dates, etc.). Table below shows these methods and their return values.
InnoObject Methods
| Method | Return |
getCreated() |
Creation time in milliseconds |
getCreatedBy() |
The user that created the object |
getDatabase() |
Database for the current entity |
getDescription() |
Description text of the object |
getDescriptionAsText() |
Strips out special characters and formatting |
getGlobalID() |
The global ID of the entity |
getId() |
The ID of the entity |
getModified() |
Modified time in milliseconds |
getModifiedBy() |
The user that last modified the object |
getName() |
Name of the object |
isHidden() |
Determines if the object is a hidden object |
isLocked() |
Determines if the object is locked |
setDescription(text) |
Updated entity description |
setHidden(hidden) |
Sets object as hidden |
setLocked(locked) |
Sets the locked state of the object |
setName(name) |
Updated entity name |
An example of using some of these methods is shown. The results of the simulation are shown in the Console panel in the figure.
To replicate the examples and experiment hands-on, download the demonstration diagram provided here and upload it to your Innoslate workspace: InnoObject Diagram
 Image 28: InnoObject Methods
6.2 InnoEntity Methods
InnoEntity methods enable the user to get and set most of the common attributes and properties of any class entity (Number). This table shows these methods and their return values.
InnoAttribute Methods
| Method(s) | Return |
setInnoClass(name), |
Entity Object |
setInnoClassById(id) |
Entity Object |
getInnoClassId() |
Id number |
getNumber() |
Entity’s Number |
hasChanged() |
Boolean: true || false |
instanceOf(name), |
Boolean: true || false |
instanceOfById(id) |
|
setNumber(number) |
Entity |
An example of using some of these methods is shown. The Console panel shown in this diagram shows the simulation results for the first three actions.
To replicate the examples and experiment hands-on, download the demonstration diagram provided here and upload it to your Innoslate workspace: InnoEntity Example

Image 29: InnoEntity Methods
6.3 InnoAttributes Methods
InnoAttributes methods enable the user to get and set any attributes of any object. This table shows these methods and their return values.
InnoAttribute Methods
| Method | Input | Return |
all() |
id: attribute value of all attributes | |
get(name), |
String | id: attribute value |
getById(id) |
Integer | id: attribute value |
getByProperty(property) |
InnoProperty | id: attribute value |
set(name,value), |
String, String | InnoEntity |
setById( i d,value ) |
Integer, String | InnoEntity |
setByProperty( property,value ) |
InnoProperty, String |
An example of using some of these methods is shown. The Console panel shown in this diagram shows the simulation results for these actions.
To replicate the examples and experiment hands-on, download the demonstration diagram provided here and upload it to your Innoslate workspace: InnoAttributes Diagram

Image 30: InnoAttributes Methods
6.4 InnoSimulation Methods
InnoSimulation methods enable the user to get and set simulation scripts. This capability would enable the user to create different scripts for execution within the simulation. This table shows these methods and their return values.
InnoSimulation Methods
| Method | Input | Return |
getScript() |
The string of the script | |
getScript(script) |
String |
An example of using some of these methods is shown. The Console panel shown in this diagram shows the simulation results for these actions.
To replicate the examples and experiment hands-on, download the demonstration diagram provided here and upload it to your Innoslate workspace: Simulation Diagram

Image 31: InnoSimulation Methods
6.5 InnoRelationship Methods
InnoRelationship methods allow scripts to query, add, remove, and manipulate relationships between entities during simulation. All changes are temporary (simulation-scoped only) and do not persist to the database after execution ends.
These methods are typically called on a relationship collection object, such as one retrieved via globals.get("rels") or entity.relationships().
InnoRelationship Methods Table
| Method | Input Parameters | Return | Description |
add( relationName, target ) |
relationName (String), target (InnoEntity | Entity | Adds a new relationship of the specified name to the target entity. |
addById( relationId, target ) |
relationId (Integer), target (InnoEntity) | Entity | Adds a relationship using a numeric relation ID. |
addByRelation( relation,target ) |
relation (InnoRelation), target (InnoEntity) | Entity | Adds using an existing relation object. |
allLazy() |
- | Lazy collection / iterator | Returns all relationships in a lazy-loaded format (efficient for large sets). |
allTargetsMultiMap() |
- | Promise (resolves to Map/object grouping targets by relation type) | Asynchronous — fetches a multi-map where keys are relationship type names (e.g., "decomposes", "decomposed by") and values are arrays of target entities or IDs. Use .then() to access the resolved value. |
allTargets() |
- |
Array of InnoEntity objects |
Returns all target entities across relationships (synchronous). |
get( name, target ) |
name (String), target (InnoEntity) | EntityRelationship object if exist, or false | Retrieves the specific relationship for the named relation. |
getById( id,target ) |
id (Integer), target (InnoEntity) | EntityRelationship object if exist, or false | Retrieves by relation ID. |
getAndRemove( name,target ) |
name (String), target (InnoEntity) | EntityRelationship object if exist, or false | Retrieves and removes in one step. |
remove(relationship)
|
relationship (EntityRelationship) | Boolean (true if successful) | Removes the specified relationship. |
anyByIdLazy(id) |
id (Integer) | Array / lazy collection of InnoRelation | Lazy collection matching the ID. |
anyLazy( name ), |
|
Array of InnoRelations | Lazy collection matching the name. |
anyTargetIdsById(relationId) |
relationId (Integer) | Array of IDs | IDs of targets with the given relationship ID. |
contains(relationship) |
relationship (EntityRelationship) | Boolean | Checks if a specific relationship exists. |
containsAny(relationName), |
relationName (String) | Boolean | Checks if any relationships of the given name exist. |
containsAnyById(id) |
id (Integer) | Boolean | Checks by relation ID. |
containsById(relationId, target) |
relationId (Integer), target (InnoEntity) | Boolean | Checks specific relation ID to target. |
containsByName(relationName, target) |
relationName (String), target (InnoEntity) | Boolean | Checks named relation to specific target. |
countAny(relationName), |
relationName (String) | Integer | Counts relationships of the given name. |
countAnyById(id) |
id (Integer) | Integer |
Counts by relation ID. |
Handling the Asynchronous allTargetsMultiMap()
allTargetsMultiMap() is asynchronous and returns a Promise. Access the resolved multi-map as follows:
rels.allTargetsMultiMap()
  .then(function(multiMap) {
    print("Relationship Targets Multi-Map:");
    print(multiMap);  // Separate print for better console display
    // Or summarize safely:
    for (const [relationId, targetEntities] of multiMap.source) {
      print("  - " + relationId + ": " + targetEntities.length + " targets");
      print(targetEntities);
    }
  })
  .catch(function(error) {
    print("Error fetching allTargetsMultiMap: " + (error ? error.message : error));
  });
In async-capable contexts:
async function onStart() {
  const multiMap = await rels.allTargetsMultiMap();
  print("Relationship Targets Multi-Map:");
  print(multiMap);
}
Best Practices for Printing Results
When printing collections (e.g., from allLazy(), anyLazy()) or maps/arrays:
Use separate lines for label and object to improve console readability:
print("All Relationships (Using allLazy()):");
print(rels.allLazy());
- Avoid string concatenation like print("Label: " + collection); — it often results in [object Object].
- Avoid deep JSON.stringify() on entity objects or full maps — it can cause "Converting circular structure to JSON" errors due to internal references.
- For summaries, loop over keys and print counts or basic properties (e.g., targetEntities.length).
Relationship names are case-sensitive and must match your schema exactly (e.g., "decomposes" vs. "decomposed by").

Image 32: InnoRelationships Diagram
To experiment hands-on, download the demonstration diagram provided here and upload it to your Innoslate workspace: InnoRelationships Diagram
Entities 1.8.1-1.8.5 have scripts in each of the following as described in the following table:
InnoRelationships Diagram Script Table
| Entity Name | Entity Script |
| 1.8.1 Get Relationships Entity |
function onStart() {
|
| 1.8.2 Get Relationship Information |
function onStart() {
|
| 1.8.3 Contains Relationship |
function onEnd() {
|
| 1.8.4 Add Relationship |
function onStart() {
|
| 1.8.5 Get and Remove Relationship |
function onStart() {
|
After Simulation, your Simulator Console will look like the following image:

Image 33: InnoRelationship Diagram Simulator Console Output
6.6 InnoLabel Methods
InnoLabel methods enable the user to perform operations like add, remove, and check for labels. This table shows these methods and their return values.
InnoLabel Methods
| Method | Input | Return |
add(label) |
InnoLabel | InnoEntity |
addByName( id ) |
Integer | InnoEntity |
addByName(name) |
String | InnoEntity |
all() |
label id: InnoLabel pairs | |
contains(label) |
InnoLabel | Boolean |
containsById(id) |
Integer | Boolean |
containsByName (name) |
String | Boolean |
ids() |
Array of label IDs | |
remove(InnoLabel) |
InnoLabel |
An example of using some of these methods is shown. The Console panel shown in this diagram shows the simulation results for these actions.
To replicate the examples and experiment hands-on, download the demonstration diagram provided here and upload it to your Innoslate workspace: Innolabel Diagram

7 Using I/Os
We have already seen how Input/Output entities are used to control the sequencing of the Actions as a trigger. With version 4.5, a “Value” attribute was added to act as a variable in the simulation. This attribute allows information transfer to be more visual in the simulation, instead of just using global variables in the script. The value attribute is a text string and can be encoded with any data type. To access the Value attribute, you can use the Sim.getIOValueByNumber(), Sim.getIOValueById(), and Sim.getIOValueByGlobalId() methods for the “Sim” API. To set the I/O value, you will still need to use the InnoEntity methods discussed above. An example is provided below.
7.1 Using Basic I/O API
I/O can be used to store and retrieve values using the I/O construct. The I/O construct uses the following “Sim” API found:
I/O Sim APIs
| Method | Input Value | Input Type | Return |
Sim.getIOValueByNumber()
|
Entity’s Number Attribute | String | Entity Attribute Value |
Sim.getIOValueById()
|
Entity’s ID | Integer | Entity Attribute Value |
Sim.getIOValueBYGlobalId()
|
Entity’s Global ID | integer | Entity Attribute Value |
There are two ways to retrieve the I/O value and it’s based on whether the entity has a trigger or not.
If an I/O has the following relationship used:
- “generated by”
- “received by”
The I/O will be a trigger for the entity with the “received by” relationship.
An example of using some of these methods is shown. The Console panel shown in this diagram shows the simulation results for these actions.

Image 35: Sim.GetIOValueBy Methods
If an I/O has only one relationship used :
- “received by”
The I/O will need to be set to ‘optional’ and this can be done by going to I/O “received by” relationship and turning the trigger field into “No” as seen. Doing this will avoid a deadlock when the simulation runs.
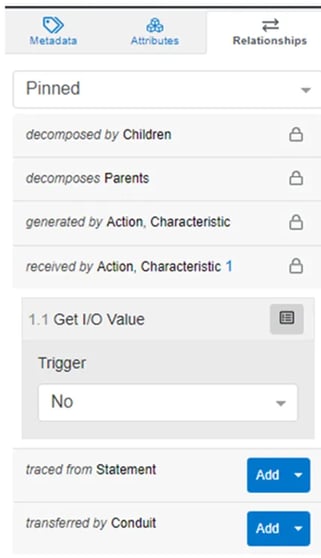
Image 36: IO Relationships Tab
An example of using some of these methods is shown. The Console panel shown in this diagram shows the simulation results for these actions.

Image 37: IO Simulator Example 1
Another use of the I/O is to set value and retrieve it for later use. To set a value for an IO is to assign a variable using the API and store a new value using “attributes().set()”. An example of using some of these methods is shown. The Console panel shown in this diagram shows the simulation results for these actions.
To replicate the examples and experiment hands-on, download the demonstration diagram provided here and upload it to your Innoslate workspace: I/O Example Diagram

Image 38: IO Script
7.2 Using Advanced I/O API
Section 7.1 provides the basics for setting and getting the IO entity value. This section will show how a user can set and get IO values from a decomposed parent diagram. This is done by making the I/O entity traced to the action entity prior to decomposing that entity. It will ensure the same IO is passed to its child entity.
To set the IO value, the user will need to handle that script in the child entity. An example of using some of these methods is shown. The Console panel shown in this diagram shows the simulation results for these actions.

Image 39: IO Child Value Script
Once the IO value is set by the child entity that IO value can be passed and used in the parent diagram. The user will need to make sure the IO is a trigger in the parent diagram to allow the value to be used. An example of using some of these methods is shown. The Console panel shown in this diagram shows the simulation results for these actions.
To replicate the examples and experiment hands-on, download the demonstration diagram provided here and upload it to your Innoslate workspace: Decomposition I/O Value Transfer Diagram

Image 40: IO Parent Value Script
To continue learning about Simulators, Click Here.
(Next Article: Exporting Simulator Results)