

Redacting sensitive information is a critical step in ensuring the confidentiality and security of your most important data. This process involves carefully removing or hiding any details that could potentially lead to data breaches or other security risks. By redacting information, you are taking proactive measures to prevent unauthorized access and protect the integrity of your data. Implementing redaction measures is crucial to restrict access to sensitive information only to authorized individuals, thereby minimizing the risk of data leaks or breaches. In Innoslate, you can achieve this through a combination of cross-project relationships and project permissions. Let's delve into this further below.
How does Redaction work?

When users do not have access to the project from which an entity is brought in through Cross-Project Relationships, the entity will be automatically redacted in the project that the users do have access to. This ensures that sensitive information is protected when entities are imported from other projects.
In the image above, you can see a split screen showing two users, 'S' and 'J', viewing the same document in the project. Notice the cross-project indicators (![]() ) indicating entities that were brought into the document (Section 3). User 'S' has full access to both projects, imported the cross-project entities and has full access to all the data. On the other hand, user 'J' only has access to the current project. Since user 'J' does not have access to the project where the entities originated, user 'J' can see that entities exist int he current project, but they are redacted due to the project permissions configuration.
) indicating entities that were brought into the document (Section 3). User 'S' has full access to both projects, imported the cross-project entities and has full access to all the data. On the other hand, user 'J' only has access to the current project. Since user 'J' does not have access to the project where the entities originated, user 'J' can see that entities exist int he current project, but they are redacted due to the project permissions configuration.
How to Redact data in Innoslate
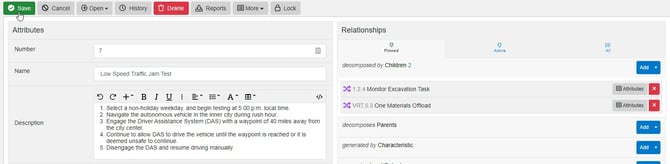
1. From where you can make a relationship, click the dropdown arrow next to ‘Add‘ on the relationship you want to use to relate the two entities and then click ‘Relate Existing Entities‘.

2. Click the gear button next to the entity dropdown menu and then expand the ‘Projects’ section by clicking on it.

3. Locate the project you wish to relate the current entity to either by clicking on it in the list or searching for it in the input and then clicking the project name in the search results.
⚠️ It is important to ensure that the project you are importing entities from is not shared with the other users in the project you are bringing these entities into. This is THE most crucial aspect of constructing a redacted view.

4. Click the entitie(s) you want to relate to in the dropdown menu. You may need to increase the search limit by clicking ’30 entities’ or ’50 entities’ if you can’t find the entity you’re looking for as shown in the image above.

5. Click the green checkmark above the gear icon to finish adding the cross-project relationships.
6. Click the green ‘Save‘ button to persist the changes to the database.
Examples of Redaction in Other Views
When a user opens a diagram with a cross project relationship, the entity is redacted. This ensures the integrity of the visual representation of a Tree Diagram and keeps the confidentiality of the information. Below is an example of a Tree Diagram, with redacted entities (top branch). This feature allows for a comprehensive and secure way of visualizing data while still upholding strict access controls and confidentiality measures.

Redacted Tree Diagram
When a document, diagram, or other Innoslate product includes cross-project relationships to entities that a user does not have access to, the card on the dashboard will display like below.

Redacted View on a Dashboard