
Innoslate provides the ability to run reports in ‘Database View‘ via the ‘Reports’ feature.
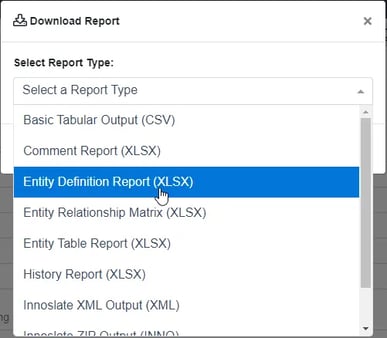
List of Available Database View Reports
The table below outlines all the report types supported by Innoslate. Each of the reports can be customized from the ‘Download Reports’ Modal.
- Basic Tabular Output: A full output of the entities in the database to a .csv file.
- Comment Report: A table of the user comments from the selected entities to a .xlsx file.
- Entity Definition Report: An output of all attributes, labels, and relationships for the selected entities to a .xlsx file.
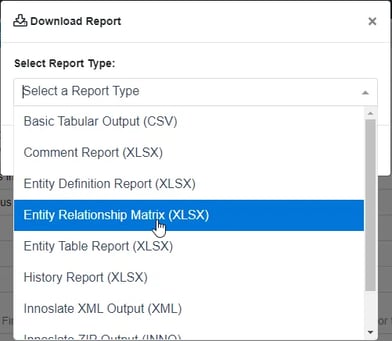
- Entity Relationship Matrix: A matrix of the selected entities’ relationship to other entities through a single relationship.
- Entity Table Report: A full output of the entities in the database to a .csv file. (Updated to reflect 4.9 options)
- History Report: An output of the history and changes of the selected entities to a .xlsx file.
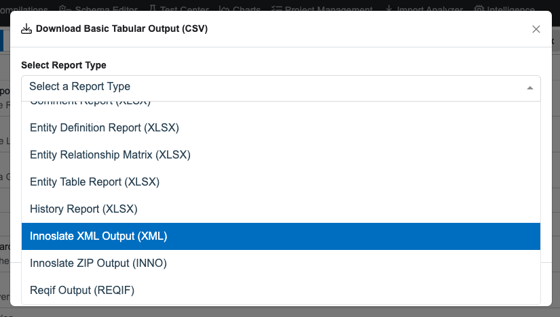
- Innoslate XML Output: A full output of the database to a .xml file. Note that XML files are only forwards compatible and must be imported to version 3.9.0.15 or later.
- Innoslate ZIP Output: A full output of the database to a .inno file including files and images.
- Reqif Output: A full output of the database to a .reqif file.
You will find the ‘Reports’ button used to run reports at the top center of the toolbar in ‘Database View’, to the right of the ‘Search’ field.

.webp?width=581&height=302&name=chrome_eWuOvzlpmh%20(1).webp)
Steps to download the Basic Tabular Output report
1. Select Basic Tabular Output from the reports drop-down.
.webp?width=572&height=312&name=chrome_jZiCwLqVrs%20(1).webp)
2. Select Options to Include.
.webp?width=615&height=405&name=chrome_FzwHbbmWd8%20(1).webp)
3. Select the sort option with the number as default.
.webp?width=605&height=315&name=chrome_yNKbjLi7Jn%20(1).webp)
4. (Optional) Enter a name for the report output file.
.webp?width=623&height=324&name=chrome_nVFMdpP2A7%20(1).webp)
Step 5: Click ‘Create’.
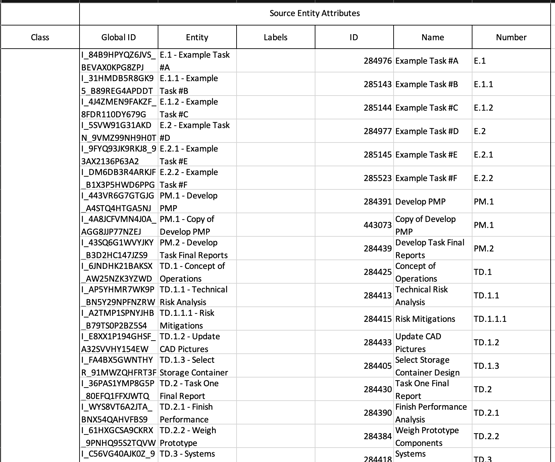
The file should begin downloading. Please note that depending on the size of your project, this can take a few moments. The output should look similar to this:

Comment Report
The Comment Report is a table of the user comments from the selected entities to a .xlsx file.
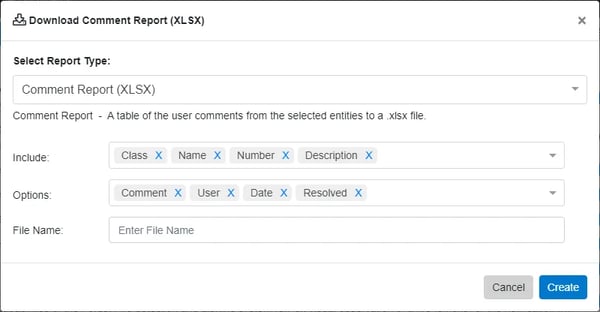
Steps to download the Comment Report
1. Select Comment Report from the reports drop-down.

2. Select Options to Include. All options are selected by default.
3. Select comment options to include. All options are selected by default.
4. (Optional) Enter a name for the report output file.
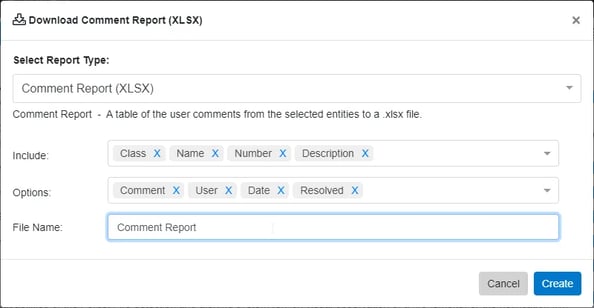
5. Click ‘Create’.
The file should begin downloading. Please note that depending on the size of your project, this can take a few moments. The output should look similar to this:

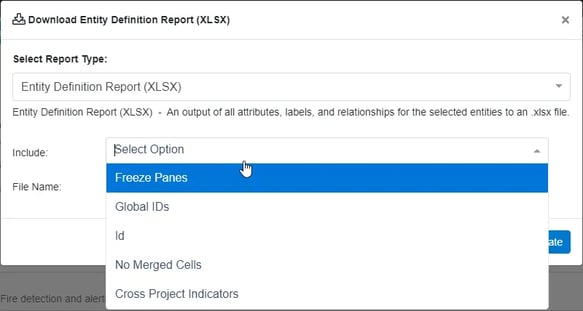
Entity Definition Report
The Entity Definition Report is an output of all attributes, labels, and relationships for the selected entities to a .xlsx file.
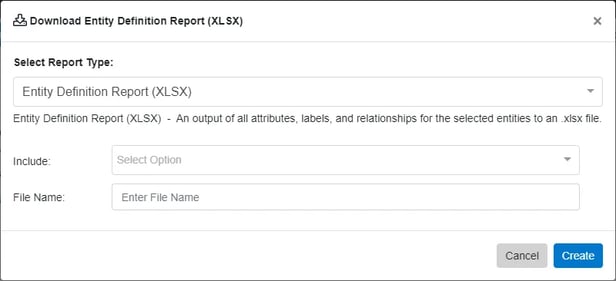
Steps to download the Entity Definition Report
1. Select Entity Definition Report from the reports drop-down.
2. Select Options to Include.
3. (Optional) Enter a name for the report output file.
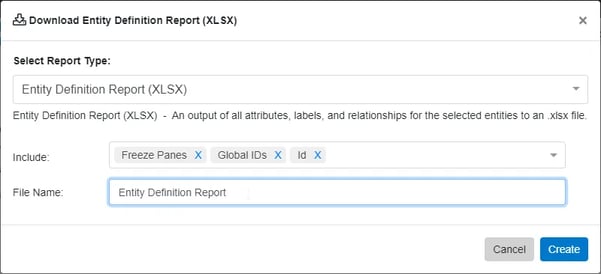
4. Click ‘Create’.
The file should begin downloading. Please note that depending on the size of your project, this can take a few moments. The output should look similar to this:

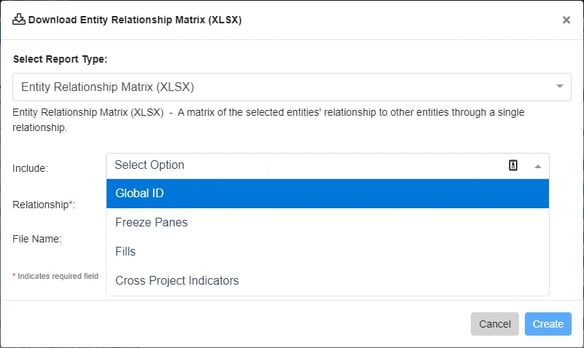
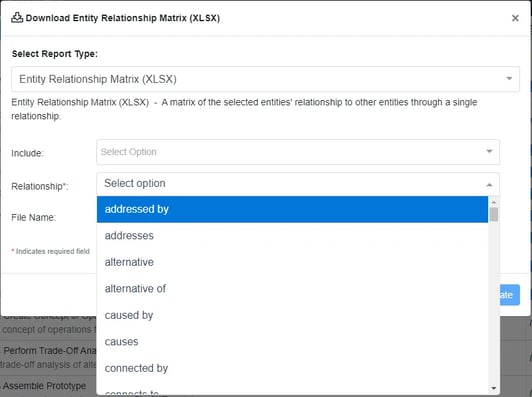
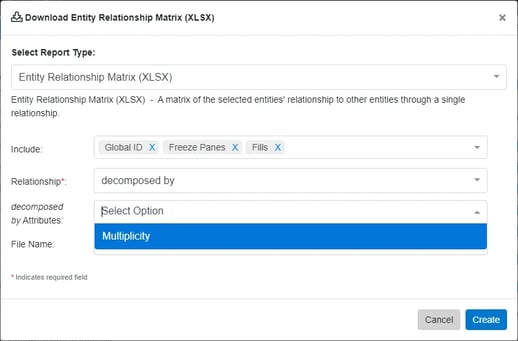
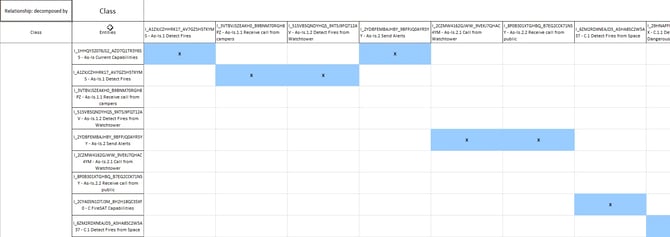
Entity Relationship Matrix
The Entity Relationship Matrix is a matrix of the selected entities’ relationship to other entities through a single relationship.
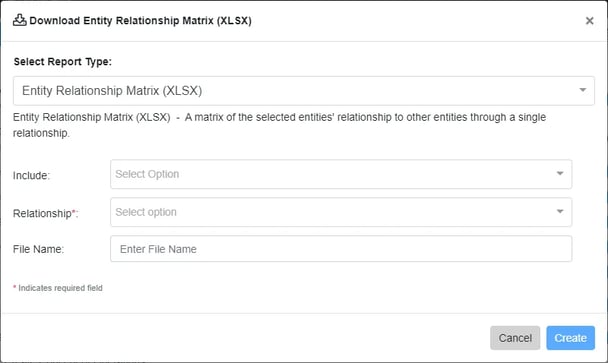
Steps to download the Entity Relationship Matrix
1. Select Entity Relationship Matrix from the reports drop-down.
2. Select Options to Include.
3. Select the relationship.
4. (Optional) Select a relationship Attribute.
5. (Optional) Enter a name for the report output file.
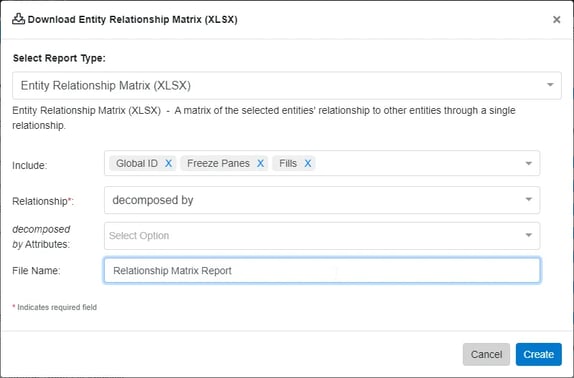
Step 6: Click ‘Create’.
The file should begin downloading. Please note that depending on the size of your project, this can take a few moments. The output should look similar to this:
Entity Table Report
The Entity Table Report is a comprehensive output of the entities in the database to a .csv file. It offers a detailed snapshot of the entities, useful for backups or for importing into other Innoslate projects or tools (the steps below reflect v4.9 updates).
1. Select Entity Table Report from the reports drop-down.
The window will change to for users to choose from the following fields (the following steps reflect Innoslate v.4.9.x.x):
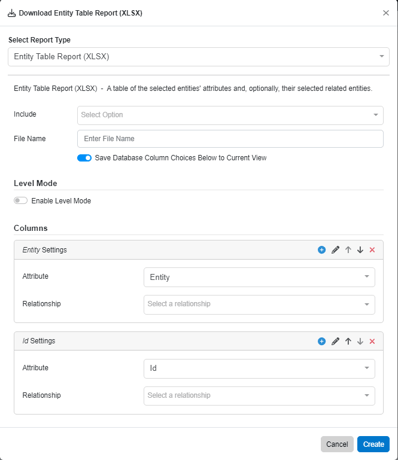
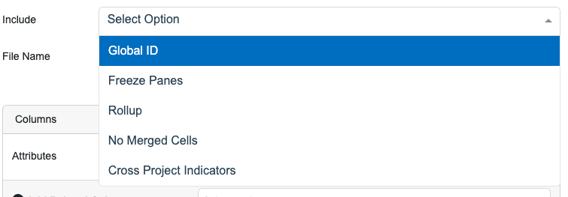
2. (Optional) All displayed below, "Select Options" to include in the report.
3. (Optional) Enter a name for the report output file.
![]()
4a. (Optional) 'Level Mode' allows for the Entity Table Report to reflect Level Mode. Note that the filters applied from the left sidebar in the Database View. 
When toggled to on (as displayed above), users may then choose to have all or user defined relationships included in the report. Users may also add columns, edit column titles, and select a particular attribute for this report. These options and locations are covered in the video below.
4b. When Level Mode is turned off, the columns' headers allow to add columns, edit column titles, reorder the columns and select a particular attribute for this report. Users may also choose a relationship and which column that it relates to by that column's selected attribute. This may be viewed in the video below:
Note, to remove a relationship or relationship attribute selected, select the field then press Backspace on the keyboard.
7. (Optional) When turned on, the 'Save Database Column Choices Below to Current View' toggle will change Database View to reflect the columns selected in the 'Download Entity Table Report' window.
![]()
8. Click ‘Create’.
The file should begin downloading. Please note that depending on the size of your project, this can take a few moments. The output should look like this:
History Report
The History Report is an output of the history and changes of the selected entities to a .xlsx file.
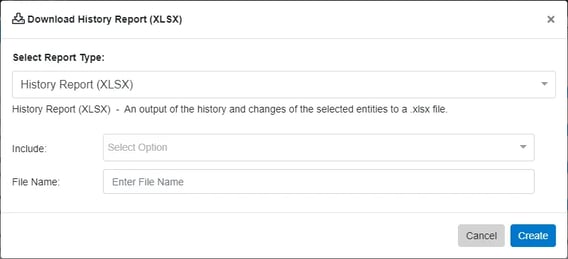
Steps to download the History Report
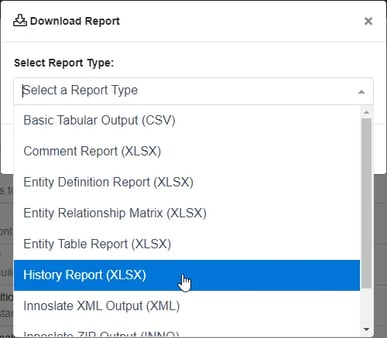
1. Select History Report from the reports drop-down.
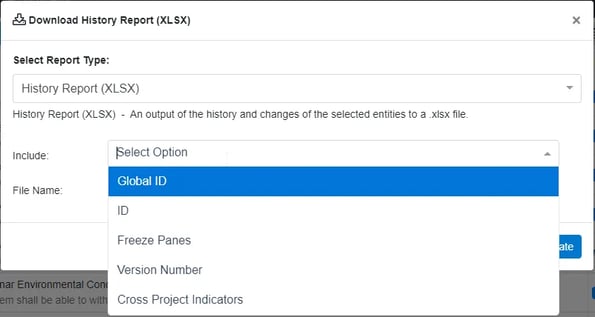
2. Select Options to Include.
3. (Optional) Enter a name for the report output file.
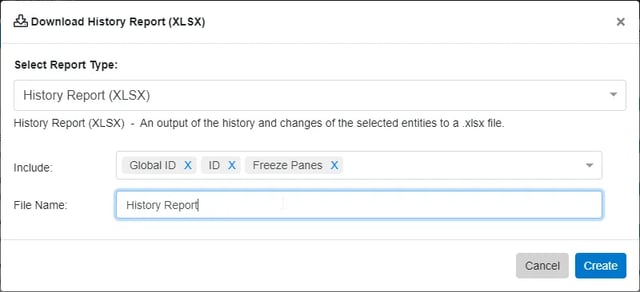
4. Click ‘Create’.
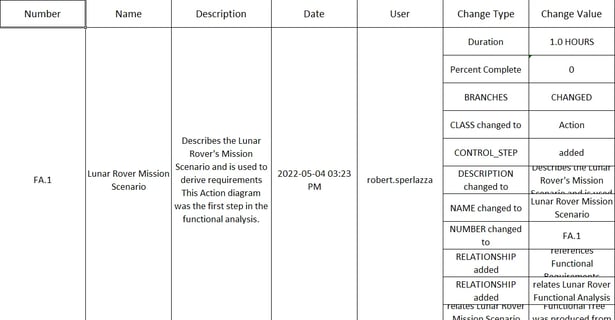
The file should begin downloading. Please note that depending on the size of your project, this can take a few moments. The output should look similar to this:
Innoslate XML Output
The Innoslate XML Output is a full output of the database to a .xml file. It is primarily used when you want to migrate data between different Innoslate instances or for archival purposes.
1. Select Innoslate XML Output from the reports drop-down.
2. Use the "Search Query" tab to include the specified query in database the user wants to export.
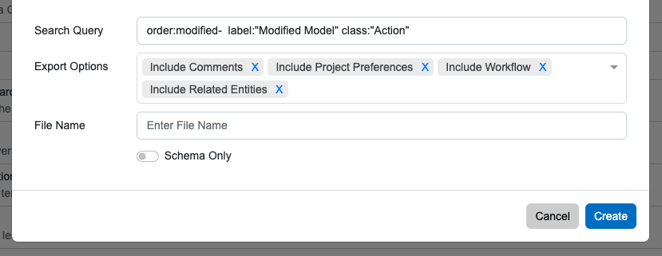
- In this example, the Label is classified as "Modified Model" from the "Action" entity class.
3. Determine the export options using the drop-down tab.
4. (Optional) Enter a file name for the report output file.
5. Click ‘Create’.
The file should begin downloading. Please note that depending on the size of your project, this can take a few moments. The output should look like this:
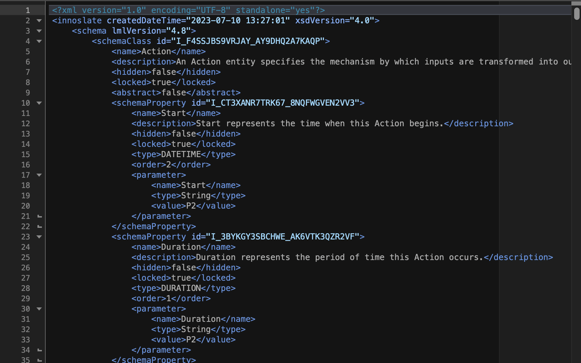
Note: XML files are only forwards compatible and must be imported to version 3.9.0.15 or later.
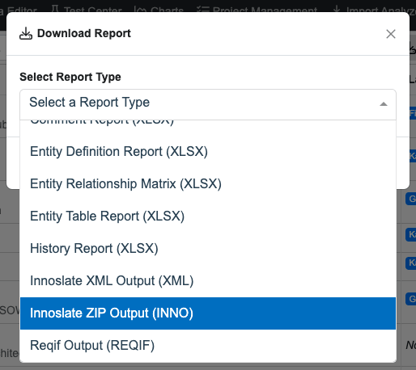
Innoslate ZIP Output
The Innoslate ZIP Output is a full output of the database to a .inno file, including files and images. It allows users to store a complete representation of their project, which is particularly useful for creating backups, archiving projects, or transferring them between different Innoslate instances.
1. Select Innoslate ZIP Output from the reports drop-down.
2. Use the "Search Query" tab to include the specified query in database the user wants to export.
- In this example, the Label is classified as "Modified Model" from the "Action" entity class.
3. Determine the export options using the drop-down tab.
4. (Optional) Enter a file name for the report output file.
Step 5: Click ‘Create’.
The file should begin downloading. Please note that depending on the size of your project, this can take a few moments. The .inno file has been exported and can be used to be imported and utilized in other functional methods.
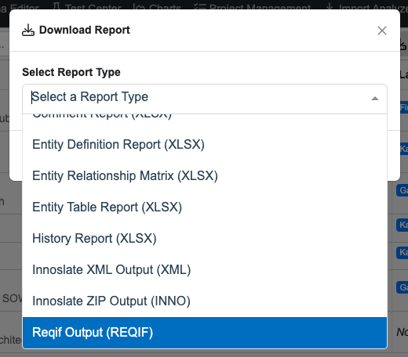
Reqif Output
The Reqif Output provides a full output of the database to a .reqif file. The Requirements Interchange Format (ReqIF) is a standard for exchanging requirements between different software tools. With the Reqif Output, you can export your Innoslate project's data in a format that can be read by other tools that support the ReqIF standard.
Steps to download the Reqif Output
Step 1: Select Reqif Output from the reports drop-down.
Step 2: (Optional) Enter a name for the report output file.
Step 3: Click ‘Create’.
The file should begin downloading. Please note that depending on the size of your project, this can take a few moments. The .reqif file has now been downloaded into your device.
Tutorial Video
To continue learning about Database View, Click Here.
(Next Article: Database Management)