Cleaning Dashboard
Overview of the Cleaning Dashboard for Super Admins
Version 4.9 introduced a powerful feature for Super Admins to effectively manage and delete users and organizations for their Innoslate Enterprise environment through the Cleaning Dashboard. Let's explore the capabilities of this new Dashboard.

Navigating to the Cleaning Dashboard
To access the Cleaning Dashboard, Super Admins should navigate to the Admin Dashboard in the Enterprise installation via the left sidebar (this option is not available in an organization's specific Admin Dashboard). The Cleaning Dashboard, identifiable by its yellow icon next to the Support Dashboard, is located in the top right corner.

Super Admins may also access the Cleaning Dashboard by entering the following URL: http://localhost:8080/admin/cleaning
Cleaning Dashboard Overview

When you first access the Cleaning Dashboard, you will see two tables: the Clean Organizations table and the Clean Users table. Now, let's delve into the available options in each.
Clean Organization
The Clean Organization table has 2 options provided right next to every organization as highlighted below, Clean or Delete.
Delete
Selecting "Delete" will permanently remove the chosen organization along with all its associated projects. To safeguard your data, we strongly recommend performing regular backups. Prior to initiating the deletion process, please ensure that you have backed up the relevant data in your database application, as this action cannot be undone.
Clean
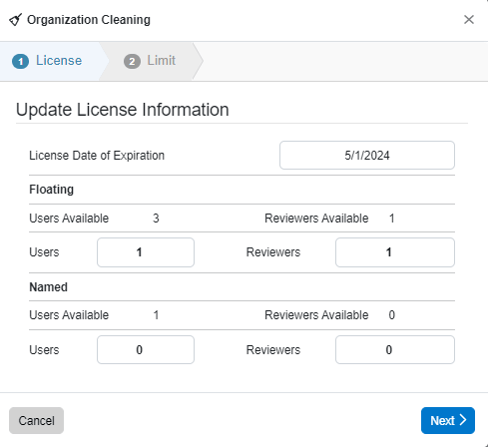
Selecting the Clean icon in the Clean Organization table opens a window that allows Super Admins to manage their organization by removing projects and modifying license counts and expiration dates as necessary.
Use this cleaning system with caution, as it is crucial for maintaining data integrity and should not be used solely for updating licenses. For guidance on how to update your licenses, please refer to the following instructions.

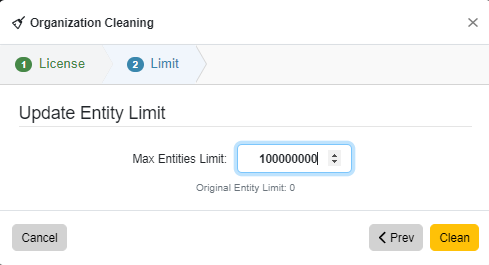
Click on 'Next' and the window will also allow users to update the Entity limit for the organization.The Entity limit is the maximum number of entities that can be created across all projects in an organization.

Select 'Clean' to have the changes take effect.
Clean Users Table
The Clean Users table has 4 areas for Super Admins to interact with:
The left side allows Super Admins to select users individually to delete.
The footer has 2 options, allowing Super Admins to indicate how many users to display (bottom right) and to page through them (bottom left).
The top right of the Users Table has 2 icons that will appear when hovering your cursor over the header area of the table. These icons allow users to Search (magnifying glass) and apply Settings (wrench).
Search

When users select the 'Search for User' Icon, a search field will appear below so Super Admins can search for a particular user.

Once a user is found and selected, a trash can will appear in the header for users to delete that user specifically:

To go back to the list, select 'Close Search'.

Settings

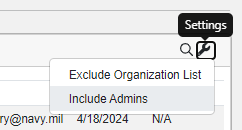
The Settings option provides Super Admins more choices for including and excluding certain users based on organization or Admin permission:

Exclude Organization List
To exclude users from a specific organization, the Exclude Organization List feature is an effective tool. This option presents a window that enables Super Admins to select the users from the designated organization they wish to exclude from the displayed list.

Select 'Update' to apply to the Clean Users Table.
Include/Exclude Admins


The Include Admins option functions as a toggle; when Admins are included in the list, the label will change to Exclude Admins. The user list will automatically update to reflect your selection accordingly.
To continue learning about Innoslate Enterprise Super Admin Docs, Click Here.
(Next Article: Settings Properties File)


