
Sections Available in Enterprise Installation
| Function | Description |
|---|---|
| Installation Requirements | Discover the specific hardware, software, and system prerequisites needed for a successful Enterprise V4.9 installation |
| Pre-Installation | Prepare your device step-by-step instructions, including tasks such as system configuration, database setup, and user account management. |
| Installation Instructions | Follow the detailed installation steps provided in the guide to install Enterprise V4.9 on Innoslate. |
| Innoslate Setup | To successfully set up Innoslate, follow the detailed steps provided in this section. |
| Troubleshooting | Install seems to not be working? Check out our troubleshooting tips. |
| Configuration Notes | Gain insights and recommendations for post-installation configuration tasks, including system tuning to tailor to Enterprise V4.9. |
Installation Requirements
Minimum Requirements:
- Windows 10/11 | Server 2016/Server 2019/Server 2022
- Dual Core Processor
- 4GB RAM
- 10GB Free Hard Drive Space, a Solid State Drive is recommended (500MB is required for Innoslate Server Files)
- A Microsoft SQL Server 2008 or higher database. SQL Server Express is supported for single computer installations. Please note: if using SQL Server, Full Text Search needs to be installed in order for Innoslate to be installed correctly.
- Alternatively, PostgreSQL databases are also supported.
Recommended Requirements:
- Windows 10/11 | Server 2016/Server 2019/Server 2022
- Quad Core Processor
- 8GB RAM
- 25GB Free Hard Drive Space, a Solid State Drive is recommended (500MB is required for Innoslate Server Files)
- A Microsoft SQL Server 2008 or higher database. SQL Server Express is supported for single computer installations.
- Alternatively, PostgreSQL databases are also supported.
Pre-Installation
- Install database software that will be used to connect to Innoslate. Innoslate supports SQL Server 2008 (or newer) and PostgreSQL. Express with Advanced Services (SQLEXPRADV) is required to support Full Text Search.
- Please note that if using SQL Server, Full Text Search must be installed.
- Also note that if using SQL Server, you must create the database within SQL.
- Check minimum installation requirements.
- Please note that Usernames and Passwords for any accounts in your database application or Innoslate cannot contain the following special characters:
a. # b. %
c. ^ d. &
e. + f. "
g. ' h. \
i. { j. }
k. | l. ! - With the release of Innoslate Enterprise v4.9, Enterprise users are required to provide a unique Innoslate License ID before receiving their official License Key. This ID is generated in the Setup within the Innoslate software. This Innoslate License ID is an assigned code that binds your license to the computer where Innoslate is installed. This ID can be retrieved in Steps 3 & 4 in the Setup section below. It's important to note that this step is not necessary for Enterprise trial users.
- Download Innoslate Enterprise v4.9 with this link (once you click on this link the file will start to download): 4.9 Installer
Installation Instructions
- After the .exe file has finished downloading and has been opened,, a windows prompt will appear from the Windows User Account Control stating that The Microsoft Defender has recognized an app that's unverified. Proceed by clicking "Run Anyway".
- The next Windows prompt will come up to permit Innoslate to makes changes to your computer. Click “Yes” to continue.

- The Innoslate Setup Wizard will open. Click “Next” to continue:

- The wizard should prompt to agree to the license agreement. Click “I Agree” to continue.

- Ensure the Innoslate4 and Service components are checked for install. Click ‘Next’ to continue.

- Keep “C:\Innoslate4” as the destination folder, and click “Next” to continue.

Once the install has completed, click “Finish.”
'Launch Innoslate Setup' is defaulted to start. This will open your default browser to begin the Innoslate Setup. If it does not automatically launch, users may open up their browser and navigate to the Setup Panel at http://localhost:8080/setup/ (or follow the same URL pattern for their particular environment).
If you already possess a pre-configured settings properties file that aligns with your requirements, you can skip the setup steps below entirely. Just be sure after dropping a copy of the file in the WEB-INF File to restart the Innoslate service.
Innoslate Setup
1. Select 'Begin Set Up'.

2. Accept the Innoslate End-User License Agreement and click ‘Next:
3. The license step has been updated in v4.9 to assign your machine a unique Innoslate License ID. To get the Innoslate License ID, users will select the proper Platform Type for the environment. The options provided are Local, Amazon Web Services, Azure, Docker and Legacy. Note, trial Enterprise users will select the Legacy option. These users will skip to Step 5.

⚠️Be aware that the Innoslate License ID Generator will produce the following error will appear if the wrong Platform Type is selected:
4. Send the Innoslate License ID generated from this page to your Account Manager and Support.
5. Once the license key is retrieved, select 'I have received a Global License Key' so the License fields appear.
6. Select the Run Type. These options depend on if the environment is for Innoslate, Sopatra or Omnis (both). Then drop your license key file, or click to select and upload the license key file, and click on ‘Validate’. Check to make sure the correct license count and expiration date pop up. Click ‘Next’ to continue.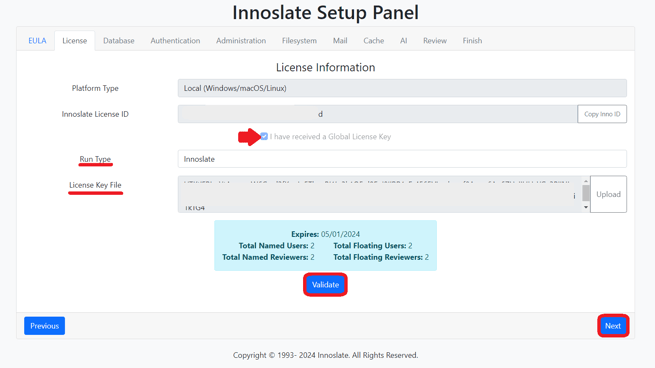
7. Proceed to the next step to set up the database connection between Innoslate and your database application.
The bulletted points provided below are tips for this step that may be relevant to your specific environment, as this step is dependent on the database application selected.
- In PostgreSQL, you do not have to create a database to connect Innoslate to it. You simply need to create the Master Password when you login via pgAdmin 4, after installing PostgreSQL.
- If you are using a SQL database, leave “Microsoft SQL Server” selected. The “Username” and “Password” fields are for the database administrator credentials.
- If you are using SQL,make sure the database has been created before this step.
- If the Database application is located on a different computer, you can enter that computer’s IP address or Machine Name in this field.
- PostgreSQL’s default port is 5432 and SQL Server is 1433. If this has been changed for your configuration, please reflect the proper port to your environment.
- The database connection string will populate as you fill in the fields above it.Fill out the fields on this page to access your database per your configuration. The below picture is an example with PostgreSQL installed on the same computer Innoslate is installed on (localhost).
- Pool information is regarding the JDBC Pool. The default is recommended.

9. Authentication options are Native, CAC, PKI, LDAP, SAML & OAUTH. This step will include the necessary details needed for the selected authentication. Once selected, click 'Next.'
You can always pick Native for now then go back and configure your authentication type after install. If this route is selected, please contact Support for the corresponding documentation.

10. This step is to set up your Innoslate System Administrator account, "Super Admin". Note, the Super Admins have complete access to configure Innoslate, adding/removing licenses from the install and adding/removing organizations. Note, if you do not add this account to any organization created within your configuration, this user will still be able to login without taking a license. Under the Additional Admin Users portion, users may be designated here to be an additional Admin or have access to the Support Dashboard to reset passwords or help users with their account ('Support Users').
Once this has been filled out and all the fields are cleared with the greencheck mark, click on the ‘Next’ button.

11. The next step is to configure your Innoslate Files and Filesystem.

- The file system page is for configuring your reports Innoslate outputs and to set a file size limit when uploading a file into Innoslate.
- We suggest the default for the File Information for 100MB max file upload and 10,000,000 max entities in a report.
- Filesystem information is for persistent files Innoslate generates and this file will usually be located on the machine it is installed on. You can also put it on an AWS Simple Service Storage (S3), particularly useful for Amazon Web Services environments.
11. Click ‘Next’ to configure email notifications. For users who want to have their email notification system set up, fill out the fields to reflect your environment. You can always set up with no email notifications and go back to set this up after installation. If you decide to set this up after, look at the email configurations needed here. Click 'Next' once completed.

12. This step is to set up your browser's cache options. Once selected, click 'Next.'

- Native cache option is to use Innoslate’s Tomcat
- Redis Cache option is for users using the Redis software as their cache management system. For more details on this, please contact Innoslate Support.
13. This step will allow you to select if you'd like to utilize Innoslate's OPEN AI integration. Be sure to utilize the API Key provided from OPEN AI and reflect the same organization name using that OPEN AI account (if applicable). Note, you'll have to be a paid customer with OPEN AI to retrieve these. Click 'Next' once finished.

14. This step reflects what your settings.properties file, the configuration file used within Innoslate, will look like. It should reflect everything you’ve set up in the previous steps. This is where you'll review all the data inputted to ensure everything has been setup correctly. Once completed, click 'Next.'

15. The Finish Step requires applying the settings configured. At this step, click ‘Apply Settings’.

Once everything confirms the final steps with all checkmarks, note the popup that states Innoslate must be restarted either by restarting the Innoslate4 Window's service or by running restart_innoslate_service.cmd found in the utilities folder in Innoslate4. Click 'Finish' then restart the Innoslate service.
16. Access the login page by opening your web browser and entering the designated URL (http://localhost:8080/ or any other specified configuration) and login as the Super Admin:

17. You will then be directed to the Admin Dashboard where you will create a new organization:

18. A pop up will show up to give it a name, slug description and entity limit (TIP: zero (0) is unlimited).

19. You will then be directed to your newly created organization’s Admin Dashboard. The middle bottom panel is the license panel. Hover your mouse over the top right and a pencil will appear. Click on the pencil to make edits and apply licenses to the organization as applicable.

Troubleshooting
- Innoslate Service did not install correctly and is missing: Attempt to refresh the list of services, and if Innoslate4 does not show up on the list, then navigate to your C:// drive, and locate the folder called “Innoslate4.” Click on the folder and then navigate to the “utilities” folder. In that folder there should be a utility called “install_innoslate_service.” Click on that, and the Innoslate service will be installed. Then, run the “restart_innoslate_service” batch file to start up the service.
- Unable to connect to database:
- Check the connection to your database server (whether it be SQL server, or PostgreSQL) and verify that the service is running and that the database is created.
- Check that the database admin credentials are correct, then check to make sure the username and password for the database admin credentials don’t contain special characters (e.g. # % ^ & + “ ‘ \ { } \).
- Check if the database name is correct. If all of the above settings are correct, check with your systems administrator for troubleshooting help.
- If you are using SQLServer or SQLExpress, check to make sure Full Text Search is enabled. You can determine if Full-Text Search is installed and enabled by querying the FULLTEXTSERVICEPROPERTY. Use this Query:
-
- “SELECT FULLTEXTSERVICEPROPERTY('IsFullTextInstalled')”.
- If the query returns 1, then Full-Text Search is enabled. If it returns 0, then Full-Text Search is not enabled and you will need to run SQL Server Installation Center to add the Full-Text Search feature.
-
- Java version issues: Locate the “Utilities” folder and click on “set_java_home_path.” This batch file will attempt to locate your java home path, and if java is not installed, it will install it automatically.
- Browser setup was interrupted: if you accidentally closed the browser before setup was complete or if your internet connection failed and you need to start the process over again, navigate to the “utilities” folder, and click on “launch_localhost_setup.” This batch file will bring up your browser and start the setup process for you.
- Innoslate hangs/won’t start: First, make sure your Innoslate service is running. If you are unsure, navigate to the “utilities” folder and click on".
Configuration Notes
General
The following configurations discussed below will be applied to the configuration file confirmed in step 15 in the Innoslate Setup. This file is the settings properties file located at: Innoslate4\apache-tomcat-8.5.30\webapps\innoslate4\WEB-INF
⚠️Any changes made to this file will always require a full restart of the Innoslate service to apply.
Configuration Mail Notifications
In order to configure mail notifications within your local installation, you will need to navigate to your “settings.properties” file, found within the Innoslate4 folder at the following directory: “Innoslate4\apache-tomcat-8.5.30\webapps\innoslate4\WEB-INF”. Next you will need to add the following fields:
- IMPORTANT_MAIL_FROM = <email@address.com>
- IMPORTANT_MAIL_FROM_FROMNAME = Innoslate
- MAIL_SMTP_USERNAME = <YourSmtpUsername>
- MAIL_SMTP_PASSWORD = <YourSmtpPassword>
- MAIL_HOST = <SMTP mail host address> (Example: email-smtp.us-east-1.amazonaws.com)
- MAIL_PORT = <mail port number> (Example: 587)
- MAIL_FROM = <email@address.com>
- MAIL_FROMNAME = Innoslate Notification
The above settings need to be configured to point to an email server you control to have Innoslate automatically send emails out. If all these settings are configured properly, Innoslate will read these settings and send emails through your email system.
Note: after applying these setting, do a service restart in the window services or use the restart_innoslate_service.cmd which can be found in the utilities folder. Otherwise these settings changes will not take effect.
Configuration Default Organization
In order to configure a default organization within your local installation, you will need to navigate to your “settings” properties file, found within the Innoslate4 folder at the following directory: “Innoslate4\apache-tomcat-8.5.30\webapps\innoslate4\WEB-INF”. Next you will need to add the following fields:
- DEFAULT_ORGANIZATION_NAME = <Default Organization Name> (e.g. “My Organization”)
- DEFAULT_ORGANIZATION_SLUG = <Organization Slug> (e.g. “myorganization”)
This will set up a default organization to which every new user will be automatically added.
The default organization slug must be in all lowercase lettering and must not contain any spaces or special characters.
Note: after applying these setting, do a service restart in the window services or use the restart_innoslate_service.cmd which can be found in the utilities folder. Otherwise these settings changes will not take effect.
Configuring the URL Address
You have the option to customize the URL of Innoslate to match your specific environment. This feature is especially beneficial when users need to reset their password because the link generated from the Support Dashboard will be tailored to your specific environment. To configure this add the following field to your “settings” properties file, found within the Innoslate4 folder at the following directory: “Innoslate4\apache-tomcat-8.5.30\webapps\innoslate4\WEB-INF."
- SERVER_ADDRESS = https://myorganizationurl.innoslate.com
Configuring Timeout Settings
To specify your session timeout settings, you will need to navigate to your “web.xml” file, found within the Innoslate4 folder at the following directory: “Innoslate4\apache-tomcat-8.5.30\webapps\innoslate4\WEB-INF”. You will need to open it up and modify the following field:
- <session-config>
- <session-timeout>30</session-timeout>
- </session-config>
You will need to modify “30” to the number of minutes you want a session to stay active.
After applying these settings, do an Apache Server stop and restart with the shell scripts in the bin file within Apache Tomcat (C:\Innoslate4\apache-tomcat\bin) so the changes take effect.
Change Entity Report Limit
If you would like to set a specific limit to the number of entities within the reports you download, you can specify that by navigating to the “settings.properties” file, found within the Innoslate4 folder at the following directory: “Innoslate4\apache-tomcat-8.5.30\webapps\innoslate4\WEB-INF”. You will need to open it up and add the following field:
REPORT_LIMIT = number of entities
After applying these setting, do a service restart in the window services or use the restart_innoslate_service.cmd which can be found in the utilities folder. Otherwise these settings changes will not take effect.
Configuring Innoslate Port
To change the 8080 port Innoslate is running on, you'll need to access the following XML file in the Innoslate files: C:\Innoslate4\apache-tomcat\conf\server.xml and update the number "8080" to the desired port.
<Connector port="8080" protocol="HTTP/1.1"
connectionTimeout="20000"
redirectPort="8443" />
After applying these settings, do an Apache Server stop and restart with the shell scripts in the bin file within Apache Tomcat (C:\Innoslate4\apache-tomcat\bin) so the changes take effect.
Open AI Configuration
To link your OPEN AI account to your Innoslate instance the following must be added to the settings properties file:
OPEN_AI_API_KEY = <API KEY> This will be provided by ChatGPT.
OPEN_AI_ORGANIZATION = <ORG KEY> If using an organization with your OPEN AI account, your organization name will be entered here.
To turn off OPENAI by organization:
CHAT_AI_EXCLUDED_SLUGS = takes a comma-separated list of organization slugs
Example: CHAT_AI_EXCLUDED_SLUGS = test, demo
Please note, your account must be a paid OPEN AI customer for this integration to work.To continue learning about Enterprise User Guides, Click Here.
(Next Article: PostgreSQL Database Configuration)