Project Version Control Overview
Branch, Fork, and Merge in Project Version Control. Track your projects through the tree chart.
Within the Project Version Control view, projects can be branched, forked, and merged. Projects and their branches (parent and child) can be viewed in a tree chart.

Branching and Forking abilities allow you to branch and fork projects as well as merge changes between linked projects.
- Branching: Duplicates a project and allows changes to be made separately so that the two projects contain different changes. When a project is branched it creates a parent-child relationship with the new project.
- Forking: Also duplicates a project. The main difference is that a sibling relationship is created with the new project. This creates a tree-like structure where both projects share the same parent project.
- Merging: Takes any additions, changes, deletions, and restores of a source project and integrates them into a target project. Merging can only take place between projects that have a direct parent-child relationship. This relationship can be verified by viewing the projects on the tree chart contained on the ‘Project Version Control’ page.
Projects and their (parent and child) branches can be viewed in a tree chart. Just above the tree chart, there are quick links available to navigate to the source and target projects.
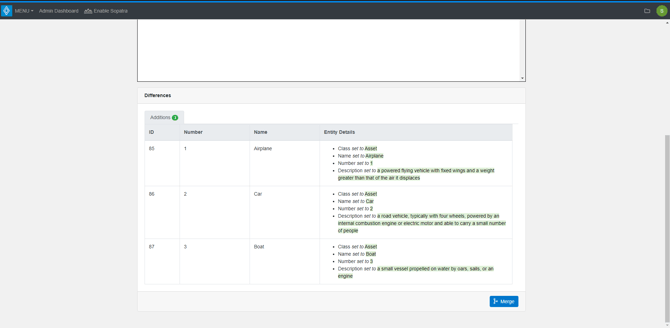
Changes between project branches are displayed in a table including additions, changes, deletions, and restores. If there are differences between the two projects, the projects can be merged.
Navigating to Project Version Control
Innoslate provides multiple options for navigating to the ‘Project Version Control’ view:
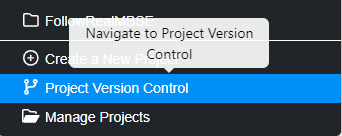
Option 1.) By opening the Folder icon 'Switch Projects' in the top right of the navigation bar

and selecting the ‘Project Version Control’ button:

Option 2.) From the ‘Organization Dashboard’ via the ‘Project Version Control’ button.

Option 3.) From the ‘Manage Projects’ view via an icon on the right-hand side.

Creating a Branch/Fork
- Create a new Branch/Fork by clicking the ‘+ Branch/Fork’ button on the right of the page.
- Select from the following:
Branch Project: This option allows you to create a new Child Project that is linked to the original project, enabling independent modifications while maintaining a connection.
Fork Project: This option duplicates the original project but establishes no relationship with it, allowing for completely separate development.
Branch to Existing Project: With this choice, you can create a new branch that forms a Parent relationship with an already existing project within your organization.
- This will open the modal to begin the creation process.
- The Name field for the new project is the only required section. The ‘Schema Only’ checkbox is optional. Selecting this will create a new branch (or fork) that only copies the schema of the source project.
- The ‘Options’ dropdown is also optional. Note: Adding the ‘Include Baselines’ option to the list will automatically add the ‘Include History’ option as this is required for baselines to work properly.
- Select the ‘Confirm’ button. This will create the new branch (or fork).
Merge Projects
- To merge projects select a source project from the ‘Source Project’ dropdown.
- Then select a target project by using the tree chart generated. The chart displays any parent and child branches that exist. The ‘Full Screen’ button enlarges the tree chart to fill the entire window.
- At the bottom, the ‘Differences’ table displays any changes, additions, deletions, and restores to be merged from the source project into the target project.
If there are more than 1000 additions, changes, deletions, or restores the count will be abbreviated to ‘999+’. - If there are more than 2000 additions, changes, deletions, or restores then the table will provide a ‘Load More’ button which will load up to the next 2000 updates to be viewed in the table. Note: Although updates over 2000 are not visible on the table without loading more, all the available updates will still be merged in the merging process.
- At the bottom, the ‘Differences’ table displays any changes, additions, deletions, and restores to be merged from the source project into the target project.
- Select the ‘Merge’ button at the bottom of the page.
- Review the information in the modal. Then select the ‘Confirm Merge’ button at the bottom of the modal.
- Select the ‘Go To Target Project’ button once the merge is complete in order to navigate to the newly merged target project.
Known Issues
Merging changes, deletions, and restores into the target branch will initially cause duplicate updates. These are not actually duplicates but visually they will appear as such.
Example: The project outlined in red is the source project (parent project) and has updates to be merged into the target project (child project) outlined in blue.
After merging the updates, and returning to the ‘Project Version Control’ view, select the old target project (child project) as the new source project outlined in red, and the old source project (parent project) as the new target project outlined in blue.
The exact updates that were merged into the old target project (child project) are displayed in the differences table as if they are new updates. If merge is selected again at this point both branches will be up to date according to the system, but no actual changes to the database will have been made.

Just above the tree chart, there are quick links available to navigate to the source and target projects.

Changes between project branches are displayed in a table including additions, changes, deletions, and restores. If there are differences between the two projects, the projects can be merged.

Change Comparisons
When fork/branching has been initiated, Innoslate will have the capability to compare the changes made on one project, compared to the other related one. In the figure below you can view the differences/deletions tabs in the bottom of the Project Version Control tab

Merging
Additionally, in the very bottom of the differences tab, the "merge" button is used to bring the similarities and differences of the two paired projects all into one.

The system will alert the user of the merge request happening. This step is to ensure the safety of project data and avoiding accidental merging of projects that could lead to database combination/corruption.

